Opt for lightweight images containing only essential software to reduce vulnerability. This streamlined approach not only shrinks the attack surface but also boosts container performance.
Various images cater to this need, each with distinct advantages and drawbacks, tailored to specific use cases. Popular options encompass:
Alpine Linux: A mere 5 MB lightweight Linux distribution, favored for Docker setups due to its diminutive size.
Ubuntu Minimal: Stripped-down version of Ubuntu, weighing around 50 MB, crafted explicitly for container environments with minimal essential packages.
Scratch: A unique Docker image resembling an empty container, devoid of any package manager or system utilities, ideal for crafting truly minimalist images from scratch.
BusyBox: A minimalist Linux distro packing common Unix utilities like ls, cp, and grep, weighing just about 2 MB, suitable for compact Docker setups.
Tiny Core Linux: Another lightweight distribution for container images, tipping the scales at a mere 16 MB and featuring a minimalist graphical user interface.
In recent years, cloud computing has sparked a revolution in the way organizations approach the design, development, and deployment of their applications. Cloud-native architecture has risen as a prominent paradigm in the world of software development, empowering businesses to construct scalable, robust, and efficient applications. This article will delve into what cloud-native architecture is and present five essential principles to empower you in mastering it.
Understanding Cloud-Native Architecture
Cloud-native architecture is all about using the power of cloud computing to create applications tailored for the cloud environment. It’s about making the most of cloud services, microservices, containers, and DevOps practices to build scalable, agile, and robust applications.
The key components of cloud-native architecture include:
Microservices: Applications are divided into smaller, independently deployable services, allowing for better scalability, maintainability, and flexibility.
Containers: Containers provide a lightweight, consistent environment for deploying applications and their dependencies, enabling seamless deployment across different cloud platforms.
Orchestration: Container orchestration tools like Kubernetes help manage the deployment, scaling, and automation of containers, ensuring efficient resource utilization.
Continuous Integration and Continuous Deployment (CI/CD): CI/CD pipelines automate the process of building, testing, and deploying code changes, enabling rapid development cycles and quick releases.
Resilience and Scalability: Cloud-native applications are designed to handle failures gracefully and scale both vertically and horizontally to meet changing demand.
Now that we have a basic understanding of cloud-native architecture, let’s delve into five essential principles for mastering it.
1. Embrace Microservices
Microservices are at the core of cloud-native architecture. They involve breaking down monolithic applications into smaller, self-contained services. Each service focuses on a specific business capability and can be developed, deployed, and scaled independently.
To master this principle:
Design with purpose: Clearly define the boundaries of each microservice based on business capabilities and ensure that they have well-defined APIs.
Decentralize data: Avoid shared databases and favor microservices that own their data, reducing dependencies and potential bottlenecks.
Monitor and manage: Use monitoring and observability tools to keep an eye on the performance of each microservice and ensure rapid identification and resolution of issues.
2. Leverage Containers and Orchestration
Containers, such as Docker, offer a consistent environment for running applications, ensuring that code runs the same way across different environments. Kubernetes, an orchestration platform, simplifies container management at scale.
To master this principle:
Containerize applications: Package your applications and dependencies into containers to ensure consistent execution across various environments.
Adopt Kubernetes: Learn how to deploy, manage, and scale containers effectively using Kubernetes, as it is a cornerstone of cloud-native architecture.
Automate deployments: Use Kubernetes’ deployment features to automate the rollout of new versions of your application, making updates smoother and safer.
3. Implement CI/CD Pipelines
CI/CD pipelines are instrumental in achieving rapid and reliable software delivery. They automate the building, testing, and deployment of code changes, enabling frequent releases and reducing the risk of errors.
To master this principle:
Automate testing: Implement a comprehensive suite of automated tests, including unit, integration, and end-to-end tests, to catch issues early in the development process.
Monitor pipeline performance: Continuously improve your CI/CD pipeline by monitoring its efficiency, identifying bottlenecks, and optimizing for faster delivery.
Security in the pipeline: Incorporate security checks and vulnerability scanning into your CI/CD pipeline to ensure that security is not compromised during deployment.
4. Prioritize Resilience and Scalability
Cloud-native applications should be resilient to failures and capable of scaling dynamically to meet changing demands.
To master this principle:
Design for failure: Assume that failures will occur and build resilience into your applications by implementing strategies like redundancy, auto-recovery, and graceful degradation.
Horizontal scaling: Use load balancing and auto-scaling mechanisms to distribute traffic and scale out when necessary to handle increased load.
Monitoring and alerting: Implement robust monitoring and alerting systems to detect issues and take corrective actions automatically.
5. Embrace DevOps Culture
Cloud-native architecture thrives in a DevOps culture that emphasizes collaboration, automation, and continuous improvement between development and operations teams.
To master this principle:
Cultural shift: Foster a culture of collaboration, where developers and operations teams work closely together to streamline processes and share responsibilities.
Automation mindset: Automate repetitive tasks and processes, reducing manual interventions and improving efficiency.
Continuous learning: Encourage continuous learning and skill development among team members to stay up-to-date with cloud-native technologies and best practices.
In conclusion, mastering cloud-native architecture is essential for organizations looking to stay competitive in today’s fast-paced digital landscape. By embracing microservices, containers, CI/CD, resilience, scalability, and a DevOps culture, you can harness the power of cloud-native architecture to build and deliver innovative, scalable, and resilient applications that meet the evolving needs of your users and business.
Commiting kubernetes secret.yaml is a big security issue, no body should do that. secret.yaml file is masked with base64 format only. Sealed secret come to rescue, it provide encryption to your secret.yaml file. It produce sealed secret yaml is git safe.
Overview
Sealed Secrets is composed of two parts:
A cluster-side controller called sealed-secret
A client-side utility called kubeseal
Upon startup, the controller looks for a cluster-wide private/public key pair, and generates a new 4096 bit RSA key pair if not found. The private key is persisted in a Secret object in the same namespace as that of the controller. The public key portion of this is made publicly available to anyone wanting to use SealedSecrets with this cluster.
During encryption, each value in the original Secret is symmetrically encrypted using AES-256 with a randomly-generated session key. The session key is then asymmetrically encrypted with the controller’s public key using SHA256 and the original Secret’s namespace/name as the input parameter. The output of the encryption process is a string that is constructed as follows: length (2 bytes) of encrypted session key + encrypted session key + encrypted Secret
When a SealedSecret custom resource is deployed to the Kubernetes cluster, the controller will pick it up, unseal it using the private key and create a Secret resource. During decryption, the SealedSecret’s namespace/name is used again as the input parameter. This ensures that the SealedSecret and Secret are strictly tied to the same namespace and name.
The companion CLI tool kubeseal is used for creating a SealedSecret custom resource definition (CRD) from a Secret resource definition using the public key. kubeseal can communicate with the controller through the Kubernetes API server and retrieve the public key needed for encrypting a Secret at run-time. The public key may also be downloaded from the controller and saved locally to be used offline.
With enterprises containerizing their applications and moving them to the cloud, there is a growing demand for container orchestration solutions. While there are many solutions available, some are mere re-distributions of well-established container orchestration tools, enriched with features and, sometimes, with certain limitations in flexibility.
Although not exhaustive, the list below provides a few different container orchestration tools and services available today:
This tutorial will walk you through how to create a single job using a DSL script; and then add a few more.
1. Creating the Seed Job
We use a Free-style Jenkins Job as a place to run the DSL scripts. We call this a “Seed Job”. Since it’s a normal Job you’ll get all the standard benefits of Jenkins: history, logs, emails, etc. We further enhance the Seed Job to show which Jobs got created from the DSL script, in each build and on the Seed Job page.
The first step is to create this Job.
From the Jenkins main page, select either the “New Job” or “Create new Jobs” link. A new job creation page will be displayed.
[[images/newjob.png|center|frame]]
Fill in the name field, e.g. “tutorial-job-dsl-1”
Select the “Build a free-style software project” radio button.
Click the OK button
[[images/createjob.png|center|frame]]
2. Adding a DSL Script
Now that we have created our empty Seed Job we need to configure it. We’re going to add a build step to execute the Job DSL script. Then we can paste in an example script as follows:
On the configure screen, scroll down to the “Build: Add build step” pull down menu
[[images/AddBuildStep.png|center|frame]]
From the pull down menu, select “Process Job DSLs”. You should be presented with two radio buttons. The default will be “Use the provided DSL script” and a text input box will be displayed below it.
[[images/AddBuildStepSelected.png|center|frame]]
Copy the following DSL Script block into the input box. (Note: The job resulting from this will be called DSL-Tutorial-1-Test. It’ll check a GitHub repo every 15 minutes, then run ‘clean test’ if there’s any changes found.)
Click the “Save” button. You’ll be shown the overview page for the new Seed job you just created.
[[images/EmptySeed.png|center|frame]]
3. Run the Seed Job and Generate the new Jobs from the Script
The Seed Job is now all set up and can be run, generating the Job we just scripted.
(Note: As it stands right now, we didn’t setup any build triggers to run the job automatically but we could have, using the standard Jenkins UI in Step 2.)
Let’s just run it ourselves manually.
Click the “Build Now” link/button on the tutorial-job-dsl-1 overview page. It should only take a second to run.
[[images/Build1.png|center|frame]]
Look at the build result to see a link to the new Job which has been created by the running of your DSL script in the Seed Job. You should see this in the section called “Generated Jobs”. (If you don’t see it, you probably have Auto-Refresh disabled. Enable it, or just refresh the page and then you’ll see the new job.)
Follow this link to your new Job. You can run this new script-generated Job manually or wait the 15 minutes for the scm trigger to kick in.
(Note: if you have a new Jenkins server, you might be missing the Git plugin or a Maven installation which Jenkins knows about. That could cause this job to fail when run. If you need to add these, be sure to re-run the Seed Job to make sure the Scripted Job is configured correctly – it won’t be if you ran without all the necessary plugins installed in Jenkins.)
(Additional Note: if the build still fails with these plugins / config set up, it may be because the new job is using a “default” maven rather than the one you just added.)
4. Adding additional Jobs to the DSL Script
To show some more of the power of the DSL Plugin, let’s create a bunch more Jobs.
Go back to the ‘tutorial-job-dsl-1’ Seed Job
Click the “Configure” link/button and navigate back down the the “Process Job DSLs” build step.
Add the following into the text box, below the script which we added at the beginning.
(Note: The practicality of this block is questionable, but it could be used to shard your tests into different jobs.)
Draft
– deploy code to k8s cluster (automates build-push-deploy)
– deploy code in draft-pack supported languages without writing dockerfile or k8s manifests
– needs draft cli, helm cli, tiller on cluster, local docker, docker registry
Gitkube
–deploy code to k8s cluster (automates build-push-deploy)
– git push to deploy, no dependencies on your local machine
– needs dockerfile, k8s manifests in the git repo, gitkube on cluster
Helm
– deploy and manage charts (collection of k8s objects defining an application) on a k8s cluster
– ready made charts for many common applications, like mysql, mediawiki etc.
– needs helm cli, tiller on cluster, chart definition locally or from a repo
Ksonnet
– define k8s manifests in jsonnet, deploy them to k8s cluster
– reusable components for common patterns and stacks, like deployment+service, redis
– needs jsonnet knowledge, ksonnet cli
Metaparticle
– deploy your code in metaparticle supported languages to k8s (automates build-push-deploy)
– define containerizing and deploying to k8s in the language itself, in an idiomatic way, without writing dockerfile or k8s yaml
– needs metaparticle library for language, local docker
Skaffold
– deploy code to k8s cluster (automates build-push-deploy)
– watches source code and triggers build-push-deploy when change happens, configurable pipeline
– needs skaffold cli, dockerfile, k8s manifests, skaffold manifest in folder, local docker, docker registry
Want to know more? Read ahead.
Kubernetes is super popular nowadays and people are looking for more ways and workflows to deploy applications to a Kubernetes cluster. kubectl itself has become like a low-level tool, with people looking for even easier workflows. Draft, Gitkube, Helm, Ksonnet, Metaparticle and Skaffold are some of the tools around that help developers build and deploy their apps on Kubernetes.
Draft, Gitkube and Skaffold ease the developer effort, when you are building an application, to get it running on a Kubernetes cluster as quickly as possible. Helm and Ksonnet help the deployment process once your app is built and ready to ship, by defining applications, handling rollout of new versions, handling different clusters etc. Metaparticle is an odd one out here, since it combines everything into your code — yaml, dockerfile, all in the code itself.
So, what should you use for your use case?
Let’s discuss.
Draft
Simple app development & deployment — on to any Kubernetes cluster.
As the name suggests, Draft makes developing apps that run on Kubernetes clusters easier. The official statement says that Draft is a tool for developing applications that run on Kubernetes, not for deploying them. Helm is the recommended way of deploying applications as per Draft documentation.
The goal is to get the current code on the developer’s machine to a Kubernetes cluster, while the developer is still hacking on it, before it is committed to version control. Once the developer is satisfied by the changes made and deployed using Draft, the code is committed to version control.
Draft is not supposed to be used for production deployments as it is purely intended to be used for a very quick development workflow when writing applications for Kubernetes. But it integrates very well with Helm, as it internally uses Helm to deploy the changes.
Architecture
Draft: architecture diagram
As we can see from the diagram, draft CLI is a key component. It can detect language used from the source code and then use an appropriate pack from a repo. A pack is a combination of Dockerfile and Helm chart which together defines the environment for an application. Packs can be defined and distributed in repos. Users can define their own packs and repos as they’re present as files in the local system or a git repo.
Any directory with source code can be deployed if there is a pack for that stack. Once the directory is setup using draft create(this adds dockerfile, Helm chart and draft.toml), draft up can build the docker image, push it to a registry and rollout the app using Helm chart (provided Helm is installed). Every time a change is made, executing the command again will result in a new build being deployed.
There is a draft connect command which can port forward connections to your local system as well as stream logs from the container. It can also integrate with nginx-ingress to provide domain names to each app it deploys.
From zero to k8s
Here are the steps required to get a python app working on a k8s cluster using Draft. (See docs for a more detailed guide)
Prerequisites:
k8s cluster (hence kubectl)
helm CLI
draft CLI
docker
docker repository to store images
$ helm init
Use case
Developing apps that run on Kubernetes
Used in “inner loop”, before code is committed onto version control
Pre-CI: Once development is complete using draft, CI/CD takes over
Build and deploy Docker images to Kubernetes using git push
Gitkube is a tool that takes care of building and deploying your Docker images on Kubernetes, using git push. Unlike draft, gitkube has no CLI and runs exclusively on the cluster.
Any source code repo with a dockerfile can be deployed using gitkube. Once gitkube is installed and exposed on the cluster, developer can create a remote custom resource which gives a git remote url. The developer can then push to the given url and docker build-kubectl rollout will happen on the cluster. The actual application manifests can be created using any tool (kubectl, helm etc.)
Focus is on plug and play installation & usage of existing well known tools (git and kubectl). No assumptions are made about about the repo to be deployed. The docker build context and dockerfile path, along with deployments to be updated are configurable. Authentication to the git remote is based on SSH public key. Whenever any change in code is made, committing and pushing it using git will trigger a build and rollout.
Architecture
Gitkube: architecture diagram
There are 3 components on the cluster, a remote CRD which defines what should happen when a push is made on a remote url, gitkubed which builds docker images and updates deployments, and a gitkube-controller which is watching on the CRD to configure gitkubed.
Once these objects are created on the cluster, a developer can create their own applications, using kubectl. Next step is to create a remote object which tells gitkube what has to happen when a git push is made to a particular remote. Gitkube writes the remote url back to the status field of the remote object.
From zero to k8s
Prerequisites:
k8s cluster (kubectl)
git
gitkube installed on the cluster (kubectl create)
Here are the steps required to get you application on Kubernetes, including installation of gitkube:
$ git clone https://github.com/hasura/gitkube-example

$ cd gitkube-example

$ kubectl create -f k8s.yaml$ cat ~/.ssh/id_rsa.pub | awk '$0="  - "$0' >> "remote.yaml"

$ kubectl create -f remote.yaml

$ kubectl get remote example -o json | jq -r '.status.remoteUrl'

$ git remote add example [remoteUrl]

$ git push example master

## edit code
## commit and push
Use case
Easy deployments using git, without docker builds
Developing apps on Kubernetes
While development, WIP branch can be pushed multiple times to see immediate results
As the tag suggests, Helm is a tool to manage applications on Kubernetes, in the form of Charts. Helm takes care of creating the Kubernetes manifests and versioning them so that rollbacks can be performed across all kind of objects, not just deployments. A chart can have deployment, service, configmap etc. It is also templated so that variables can be easily changed. It can be used to define complex applications with dependencies.
Helm is primarily intended as a tool to deploy manifests and manage them in a production environment. In contrast to Draft or Gitkube, Helm is not for developing applications, but to deploy them. There are a wide variety of pre-built charts ready to be used with Helm.
Architecture
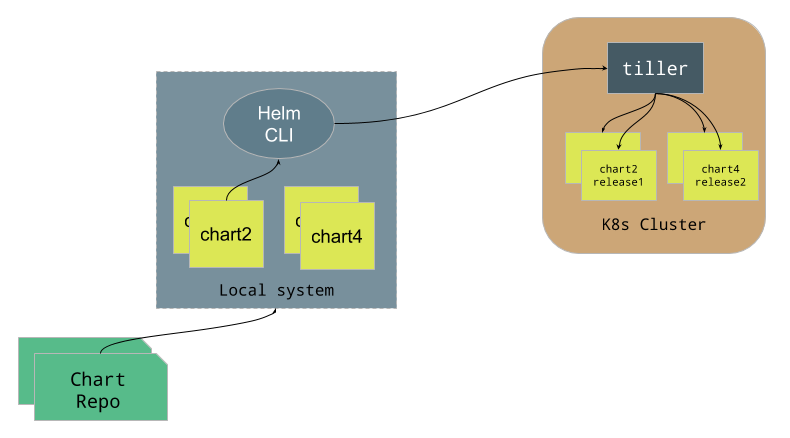
Helm: architecture diagram
Let’s look at Charts first. As we mentioned earlier, a chart a bundle of information necessary to create an instance of a Kubernetes application. It can have deployments, services, configmaps, secrets, ingress etc. all defined as yaml files, which in turn are templates. Developers can also define certain charts as dependencies for other charts, or nest charts inside another one. Charts can be published or collated together in a Chart repo.
Helm has two major components, the Helm CLI and Tiller Server. The cli helps in managing charts and repos and it interacts with the Tiller server to deploy and manage these charts.
Tiller is a component running on the cluster, talking to k8s API server to create and manage actual objects. It also renders the chart to build a release. When the developer does a helm install <chart-name> the cli contacts tiller with the name of the chart and tiller will get the chart, compile the template and deploy it on the cluster.
Helm does not handle your source code. You need use some sort of CI/CD system to build your image and then use Helm to deploy the correct image.
From zero to k8s
Prerequisites:
k8s cluster
helm CLI
Here is an example of deploying WordPress blog onto a k8s cluster using Helm:
$ helm init
$ helm repo update
$ helm install stable/wordpress
## make new version
$ helm upgrade [release-name] [chart-name]
Use case
Packaging:Complex applications (many k8s objects) can be packaged together
Reusable chart repo
Easy deployments to multiple environments
Nesting of charts — dependencies
Templates — changing parameters is easy
Distribution and reusability
Last mile deployment: Continuous delivery
Deploy an image that is already built
Upgrades and rollbacks of multiple k8s objects together — lifecycle management
A CLI-supported framework for extensible Kubernetes configurations
Ksonnet is an alternate way of defining application configuration for Kubernetes. It uses Jsonnet, a JSON templating language instead of the default yaml files to define k8s manifests. The ksonnet CLI renders the final yaml files and then applies it on the cluster.
It is intended to be used for defining reusable components and incrementally using them to build an application.
Architecture
Ksonnet: overview
The basic building blocks are called parts which can be mixed and matched to create prototypes. A prototype along with parameters becomes a component and components can be grouped together as an application. An application can be deployed to multiple environments.
The basic workflow is to create an application directory using ks init, auto-generate a manifest (or write your own) for a component using ks generate, deploy this application on a cluster/environment using ks apply <env>. You can manage different environments using ks env command.
In short, Ksonnet helps you define and manage applications as collection of components using Jsonnet and then deploy them on different Kubernetes clusters.
Like Helm, Ksonnet does not handle source code, it is a tool for defining applications for Kubernetes, using Jsonnet.
Cloud native standard library for Containers and Kubernetes
Positioning itself as the standard library for cloud native applications, Metaparticle helps developers to easily adopt proven patterns for distributed system development through primitives via programming language interfaces.
It provides idiomatic language interfaces which helps you build systems that can containerize and deploy your application to Kubernetes, develop replicated load balanced services and a lot more. You never define a Dockerfile or a Kubernetes manifest. Everything is handled through idioms native to the programming language that you use.
For example, for a Python web application, you add a decorator called containerize (imported from the metaparticle package) to your main function. When you execute the python code, the docker image is built and deployed on to your kubernetes cluster as per parameters mentioned in the decorator. The default kubectl context is used to connect to cluster. So, switching environments means changing the current context.
Similar primitives are available for NodeJS, Java and .NET and support for more languages are a work in progress.
Architecture
The metaparticle library for the corresponding language have required primitives and bindings for building the code as a docker image, pushing it to a registry, creating k8s yaml files and deploying it onto a cluster.
The Metaparticle Package contains these language idiomatic bindings for building containers. Metaparticle Sync is a library within Metaparticle for synchronization across multiple containers running on different machines.
JavaScript/NodeJS, Python, Java and .NET are supported during the time of writing.
From zero to k8s
Prerequisites:
k8s cluster
metaparticle library for the supported language
docker
docker repository to store images
A python example (only relevant portion) for building docker image with the code and deploying to a k8s cluster:
Skaffold handles the workflow of building, pushing and deploying an application to Kubernetes. Like Gitkube, any directory with a dockerfile can be deployed to a k8s cluster with Skaffold.
Skaffold will build the docker image locally, push it to a registry and rollout the deployment using the skaffold CLI tool. It also watches the directory so that rebuilds and redeploys happen whenever the code inside the directory changes. It also streams logs from containers.
The build, push, deploy pipelines are configurable using a yaml file, so that developers can mix and match tools that like for these steps: e.g. docker build vs google container builder, kubectl vs helm for rollout etc.
Architecture
Skaffold: overview
Skaffold CLI does all the work here. It looks at a file called skaffold.yaml which defines what has to be done. A typical example is to build the docker image using dockerfile in the directory where skaffold dev is run, tag it with its sha256, push the image, set that image in the k8s manifest pointed to in the yaml file, apply that manifests on the cluster. This is run continuously in a loop triggering for every change in the directory. Logs from the deployed container is streamed to the same watch window.
Skaffold is very similar to Draft and Gitkube, but more flexible, as it can manage different build-push-deploy pipelines, like the one shown above.
From zero to k8s
Prerequisites:
k8s cluster
skaffold CLI
docker
docker repository to store images
Here are the steps to deploy an example Go application that prints hello-world:
$ git clone https://github.com/GoogleCloudPlatform/skaffold
$ cd examples/getting-started
## edit skaffold.yaml to add docker repo
$ skaffold dev
## open new terminal: edit code
Let me know in the comments if I missed something out or got something wrong. I have not mentioned tools like Ksync and Telepresence, as I plan to write another post about them soon. But, if there are other tools that fit into the category of those mentioned here, please drop a note in the comments.
We’ve been trying to solve similar problems around deployment with the Hasura platform and our current approach is to:
Bootstrap a monorepo of microservices that contains Dockerfiles and Kubernetes specs
git push to build and deploy all the microservices in one shot
This method helps you get started without knowing about Dockerfiles and Kubernetes (using boilerplates) but keeps them around in case you need access to them. It also has a very simple (git push based) deployment method.
Use conditions with doubled [] and the =~ operator. Ensure not to quote the regular expression. Only BRE are allowed. If the regexp has whitespaces put it in a variable first.
if [[ $string =~ ^[0-9]+$ ]]; then
    echo "Is a number"
fi
Regexp Match Extraction
Variant #1: You can do this with grouping in bash. Despite only BRE being supported grouping works also. Note how you need to set the regexp into a variable because you must not quote it in the if condition!
REGEXP="2013:06:23 ([0-9]+):([0-9]+)"
if [[ $string =~ $REGEXP ]]; then
    echo "Hour ${BASH_REMATCH[1]} Minute ${BASH_REMATCH[2]}"
fi
Variant #2: Actually using “expr” can much simpler especially when only on value is to be extracted:
hour=$(expr match "$string" '2013:06:23 \([0-9]\+\)')
Validate IPs
If you need to validate an IP try the following function
function validate_ip {
        local net=$1
        [[ $net =~ ^[0-9]{1,3}\.[0-9]{1,3}\.[0-9]{1,3}\.[0-9]{1,3}/[0-9]{1,2}$ ]] || return 1
        [[ ${net#*/} -le 32 ]] || return 1
        local ip=${net%/*}
        local -a oc=(${ip//\./ })
        [[ ${oc[0]} -le 255 && ${oc[1]} -le 255 && ${oc[2]} -le 255 && ${oc[3]} -le 255 ]] || return 1
        return 0
}
Note that this only works for American style dates. European “25.06.2014” like dates are not supported. The simple solution is to convert them first to “2014-06-25” for example with
sed 's/\([0-9]*\)\.\([0-9]*\)\.([0-9]*\)/\3-\2-\1/'
getopt is a standalone command, supporting GNU style long parameters and parameters mixed with options and can be used like this
PARAMS=`getopt -o a::bc: --long arga::,argb,argc: -n 'myscript.sh' -- "$@"`
eval set -- "$PARAMS"

while true ; do
    case "$1" in
        -a|--arga)
            case "$2" in
                "") ARG_A='some default value' ; shift 2 ;;
                *) ARG_A=$2 ; shift 2 ;;
            esac ;;
        -b|--argb) ARG_B=1 ; shift ;;
        -c|--argc)
            case "$2" in
                "") shift 2 ;;
                *) ARG_C=$2 ; shift 2 ;;
            esac ;;
        --) shift ; break ;;
        *) echo "Unknown option!" ; exit 1 ;;
    esac
done
getopts
getopts is shell-builtin
while getopts ":ap:" opt; do
  case $opt in
    a)
      echo "Option -a ist set"
      ;;
    p)
      echo "Parameter -p is given with value '$OPTARG'"
      ;;
    \?)
      echo "Unknown option: -$OPTARG"
      ;;
  esac
done
shflags – portable getotps
If you ever need to port between different Unix derivates use shflags a Google library providing standard parameter handling. Example:
source shflags

DEFINE_string 'value' '0' 'an example value to pass with default value "0"' 'v'

FLAGS "$@" || exit $?
eval set -- "${FLAGS_ARGV}"

echo "${FLAGS_value}!"