As you build a product, your codebase keeps growing and, unless properly managed, can become a virtual Rubik’s cube for future developers to solve. Back in the day, when waterfall methodology ruled, it could take months or even years to deliver a product’s first shippable version.
Switching to Agile methods helped reduce programming cycles to weeks and introduced steady-interval delivery. Today’s practice of continuous integration (CI) rolls out program updates even faster, within days or hours. That’s the result of the frequent submission of code into a shared repository so that developers can easily track defects using automated tests, and then fix them as soon as possible. In our dedicated article, we explain in detail the benefits of continuous integration, how to approach its adoption, and what challenges to expect along the way.
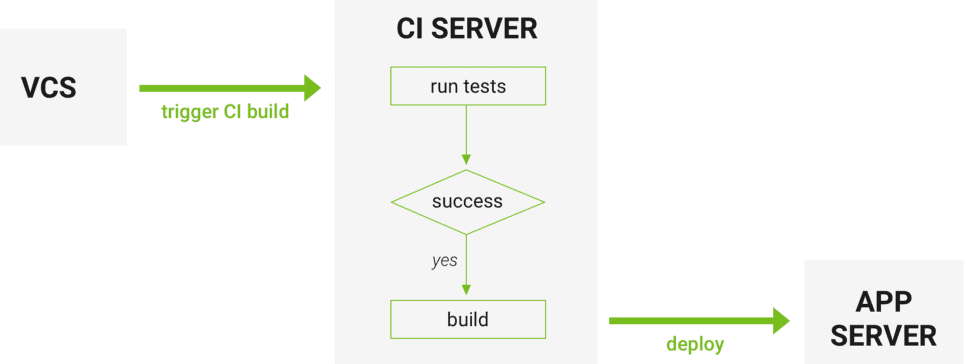
How Continuous Integration works, starting from triggering a build in a version control system (VCS) Source: Django Stars
Now, CI isn’t some magic wand that automatically fixes your workflow, you’ll need a corresponding tool. So, let’s dive into details by asking practical questions: What CI tool do I need? How hard is it to learn? What will it cost me? Will it work with my infrastructure? Which tool is the right fit for me?
Today’s market is flooded with many continuous integration tools, so choosing the right one can be difficult. Even though some tools seem to be more popular than others, they won’t necessarily work for you. Take an easy route and read this article for a clear picture of the best-of-breed CI tools: their functionality and licensing compared. Then, you’ll see which tool meets your business needs best.
How to choose a continuous integration tool
To guide you through the many options on the way to making a choice, we suggest using the following criteria:
Hosting options. Software tools differ in their infrastructure management. Cloud-based tools are hosted on a provider’s side, require minimal configurations, and can be adjusted on demand, depending on your needs. There are also self-hosted solutions. The responsibility for deploying and maintaining them rests solely on your shoulders, or rather on your in-house DevOps team. While on-premises services benefit building process flexibility, hosted solutions spare the setup hardships offering greater scalability.
Integrations and software support. How well is a CI tool integrated with other software used in development? Integration examples may include project management software (e.g. Jira), incident filling tools (e.g. PagerDuty and Bugzilla), static analysis tools, legal compliance tools, etc. A CI tool must be flexible enough to support various types of build tools (Make, Shell Scripts, Ant, Maven, Gradle), and version control software or VCS (Subversion, Perforce, Git) etc.
Usability. Some tools can make a build process much easier than others given their clear-cut and straightforward GUI and UX. A well-designed interface can save your time at the onboarding stage.
Container support. Having a deployment plugin or configuration for container orchestration tools like Kubernetes and Docker makes it easy for a CI tool to connect to the application’s target environment.
Library of reusable code. It’s preferred when a solution has a varied public store of assorted plugins, usable build steps, which could be open-source or commercially available.
Now, we’ve selected the best performers in the CI market for further analysis: Jenkins, TeamCity, Bamboo, Travis CI, CircleCI, and CodeShip. To comprehend their popularity, we compared ratings from StackShare, G2 Crowd, and Slant.co.
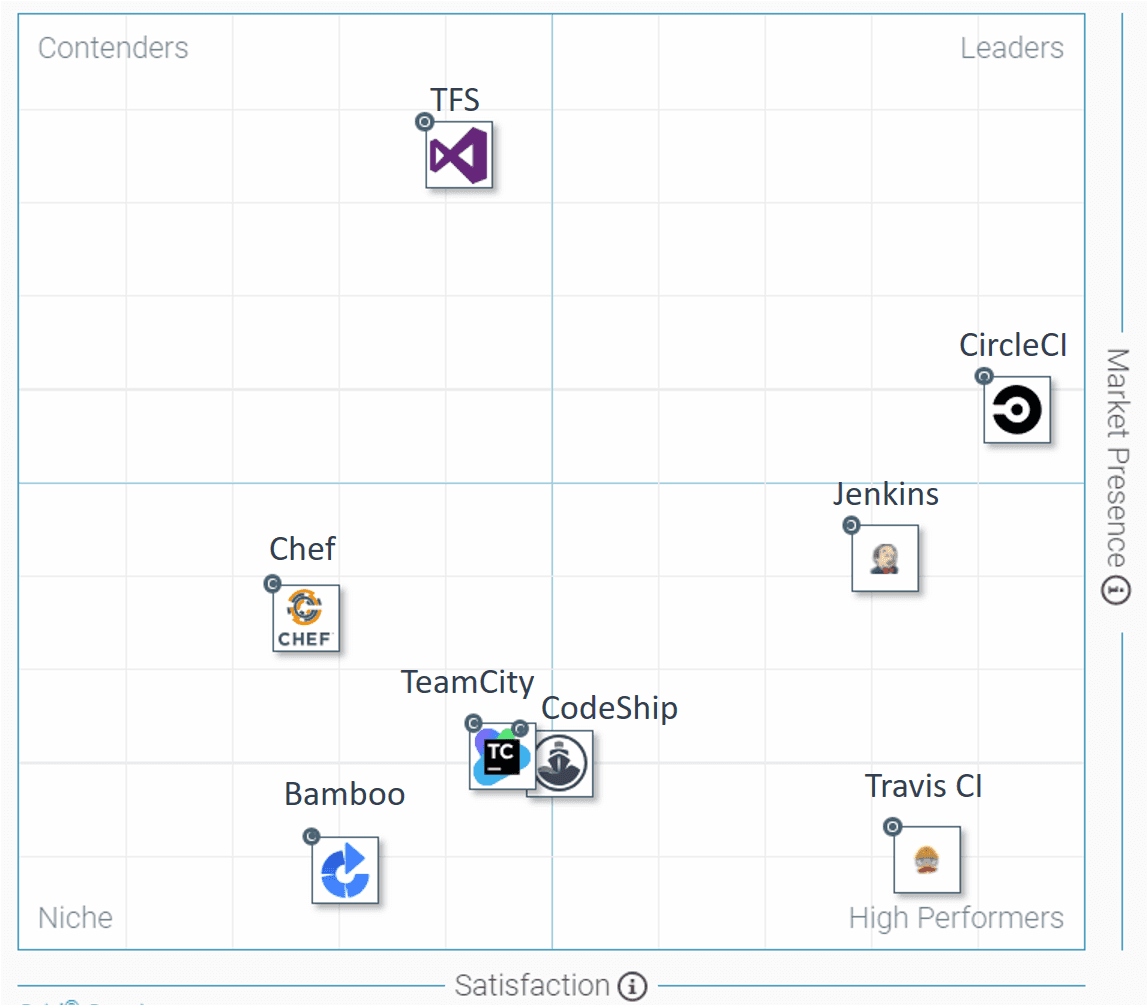
G2 Crowd Grid of the mid-market CI tools divided into leaders (CircleCI), high performers (Travis CI and Jenkins), niche (CodeShip, TeamCity, Bamboo, and Chef), and contenders represented by TFS
To get a brief overview of the CI tools, take a look at the following table of comparison. Read on for the detailed analysis of each tool.
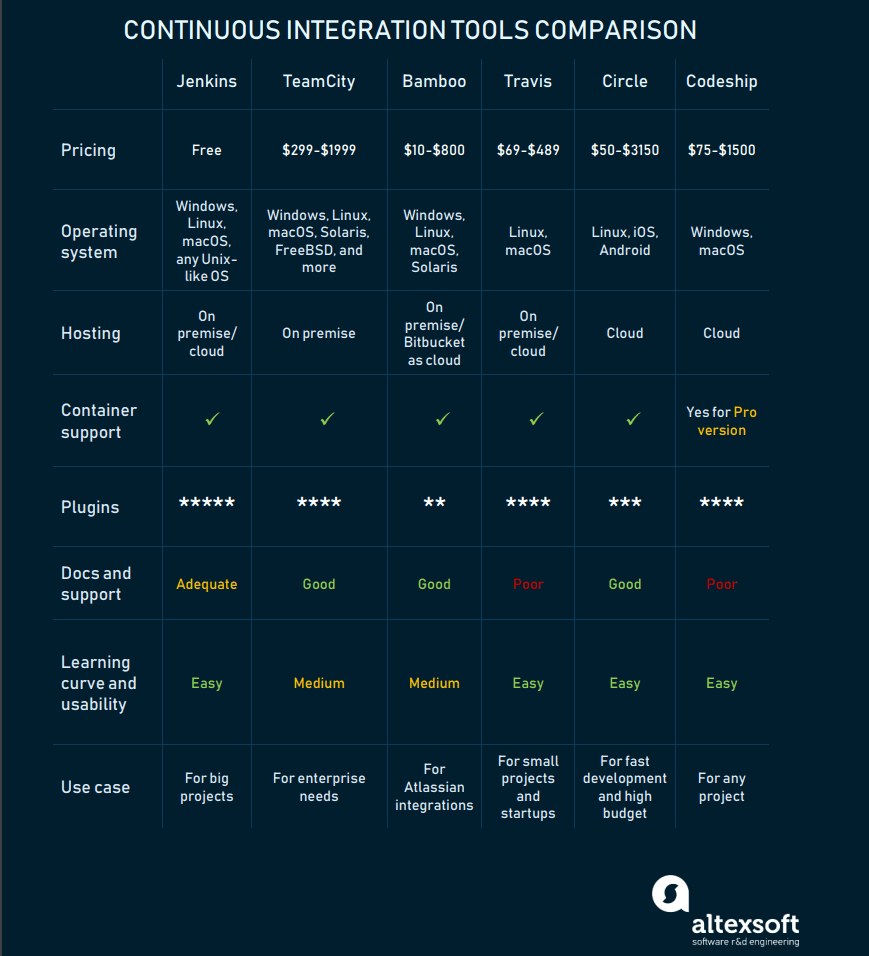
Comparing the most popular CI tools by price, integrations, support, and main use cases
Jenkins: the most widely adopted CI solution
Jenkins is an open-source project written in Java that runs on Windows, macOS, and other Unix-like operating systems. It’s free, community-supported, and might be your first-choice tool for continuous integration. Primarily deployed on-premises, Jenkins can run on cloud servers as well. Its integrations with Docker and Kubernetes take advantage of containers and perform even more frequent releases.
Main selling points
No expenses required. Jenkins is a free CI tool and that can save you money on the project.
Limitless integrations. Jenkins can integrate with almost any external program used for developing applications. It allows you to use container technology such as Docker and Kubernetes out-of-the-box. G2 Crowd reviewers claim: “No better tool exists for integrating your repositories and code bases with your deployment infrastructure.”
A rich library of plugins is available with Jenkins: Git, Gradle, Subversion, Slack, Jira, Redmine, Selenium, Pipeline, you name it. Jenkins plugins cover five areas: platforms, UI, administration, source code management, and, most frequently, build management. Although other CI tools provide similar features, they lack the comprehensive plugin integration that Jenkins has. Moreover, the Jenkins community encourages its users to extend the functionality with new features by providing teaching resources.
Active community. The Jenkins community provides a guided tour to introduce the basics and advanced tutorials for more sophisticated use of the tool. They also hold an annual conference DevOps World | Jenkins World.
Distribution of builds and test loads on multiple machines. Jenkins uses a Master-Slave architecture, where master is the main server that monitors slaves – remote machines used for distributing software builds and test loads.
Main weaknesses
Documentation isn’t always sufficient. For instance, it lacks info on pipelines creation. This adds time-consuming tasks to the list, as engineers have to work through them.
Poor UI. Its interface seems a bit outdated as it doesn’t follow modern design principles. The absence of whitespaces makes the views look crowded and confusing. A lot of the progress features and icons are super pixelated and don’t refresh automatically when jobs finish.
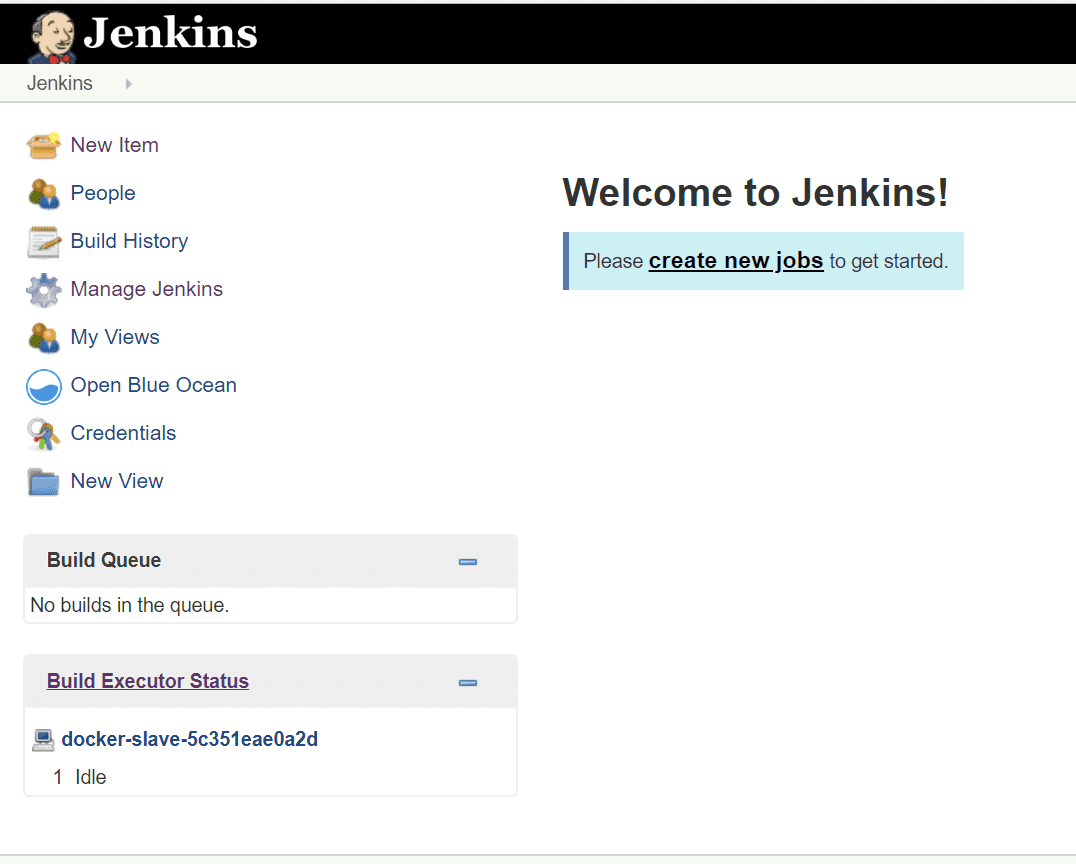
Jenkins dashboard
It takes manual effort to monitor the Jenkins server, and its slaves, to understand interdependencies among the plugins, and to upgrade them from time to time.
All in all, Jenkins serves best for big projects, where you need a lot of customizations that can be done by usage of various plugins. You may change almost everything here, still, this process may take a while. However, if you are planning the quickest start with the CI system, consider different options.
TeamCity: another major CI player
TeamCity by JetBrains is a reliable and high-quality CI server. Teams often choose TeamCity for a good number of authentication, deployment, and testing features out-of-the-box, plus Docker support. It’s cross-platform, supports all the recent versions of Windows, Linux, and macOS and works with Solaris, FreeBSD, IBM z/OS, and HP-UX. TeamCity works right after installation, no additional setup or customization necessary. It boasts a number of unique features such as detailed history reports, instant feedback on test failures, and reusing settings so you don’t have to duplicate your code.
Pricing models. TeamCity offers a free version with full access to all product features, but it’s limited to 100 build configurations and three build agents. Adding one more build agent and 10 build configurations currently costs $ 299. TeamCity offers a 60-day cloud trial that bypasses on-premises installation.
There’s also a paid enterprise edition. Its price varies depending on the number of agents included. TeamCity gives 50 percent off for startups and free licenses for open source projects.
Main selling points
.NET support. TeamCity integrates with .NET tooling better than any other CI tool out here. There are many important .NET tools included in TeamCity, such as code coverage analysis, several .NET testing frameworks, and static code analysis.
Extensive VSC support. TeamCity allows for creating projects from just a VCS repository URL. The tool supports all of the popular VCS: AccuRev, ClearCase, CVS, Git, Gnu bazaar, Mercurial, Perforce, Borland StarTeam, Subversion, Team Foundation Server, SourceGear Vault, Visual SourceSafe, and IBM Rational ClearCase. A number of external plugins are available to help with support for other version control systems.
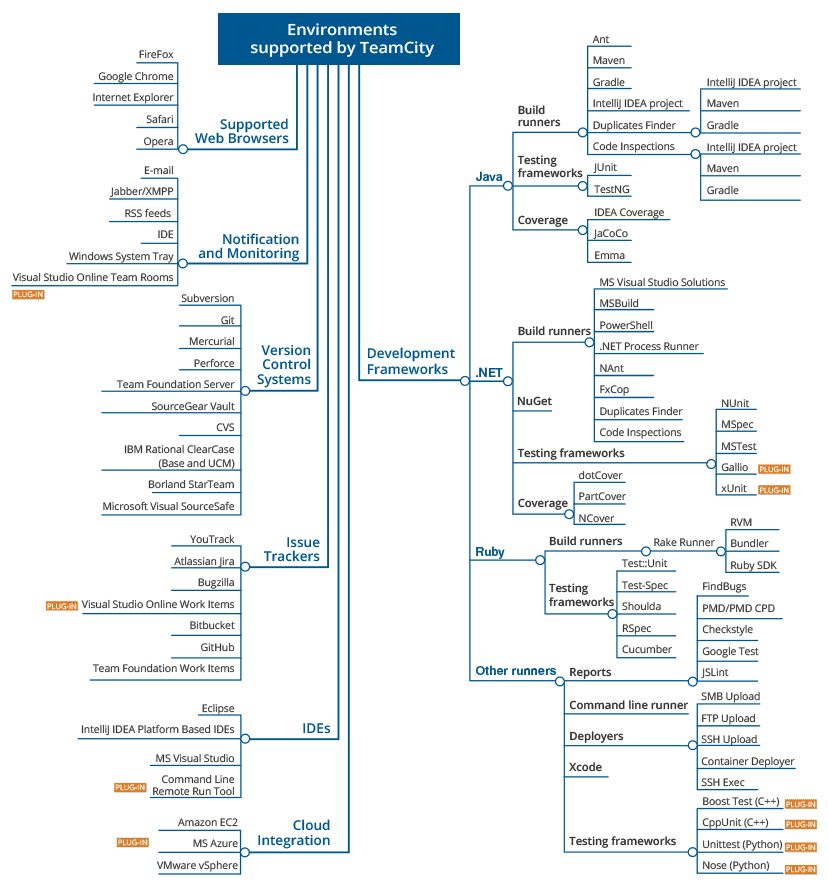
Platforms and environments supported by TeamCity
Competent docs. The overall functionality can be easily understood by going through the provided user guide, which is thorough and extensive.
Ease of setup. TeamCity is easy to set up and ready to work right after installation. It provides a good set of out-of-the-box functions for building a project.
Built-in features. TeamCity provides a good set of out-of-the-box functions for building a project: detailed history reports for builds, failures, and any additional changes made, source control, and build chain tools. One of the best features of TeamCity is “Publish Artifacts” which allows for deploying the code or even building directly in any environment. It shows the progress of the build at every step and the number of tests remaining to pass before the build is complete. It also lets you rerun any failed tests right after overnight execution, so you don’t have to waste time on that the next morning.
Main weaknesses
Difficult learning curve. Although TeamCity is well-known for its visual-aesthetic UI, it still can be a bit complex and overwhelming for newcomers, while offering a wide range of configuration options. It may take developers some serious study before they are ready to use the tool in production.
Manual upgrading process. Moving from one major version to another is a long process that has to be done manually on your server.
Given its complexity and price, TeamCity will serve best for enterprise needs and self-supporting teams ready to build their own plugins when needed.
Bamboo: out-of-the-box integration with Atlassian products
Beyond assisting with integration, Bamboo has features for deployment and release management. While Bamboo has fewer out-of-the-box options, it integrates natively with other Atlassian products: Bitbucket, Jira, and Confluence. In fact, the same integration takes Jenkins a huge plugin scheme. Just like the previous two tools, Bamboo runs on Windows, Linux, Solaris, and macOS. For those who run Bamboo on Linux, they insist on creating a dedicated user to prevent any potential abuse.
Pricing models. Bamboo is free to try for 30 days. After that, its user tier options include unlimited local agents and 10 jobs and scale up to 1000 remote agents with the price ranging from 10$ to 126,500$ accordingly. There’s a 12-month maintenance period included. This period can be doubled or tripled for more money. Atlassian software is free for any open source project that meets their defined criteria.
Main selling points
Bitbucket Pipelines. After Atlassian discontinued Bamboo Cloud in 2016, the tool became available only on-premises. However, Atlassian produced Bitbucket Pipelines, a cloud alternative built into Bitbucket – a Git repository management solution. Pipelines can be fully integrated with Bamboo. As a custom configured system, Bitbucket Pipelines enables automatic building, testing, and deploying of the code, based on a configuration file in the repository. By utilizing the power of Docker, Bitbucket Pipelines is offering very efficient and fast builds. Eventually, the Bamboo server is still available for on-prem installation and can be hosted in a cloud-based container or VM.
Multiple notification methods. Bamboo Wallboard shows build results on a dedicated monitor and sends build results to your inbox or your dev chat room (e.g. HipChat, Google Talk).
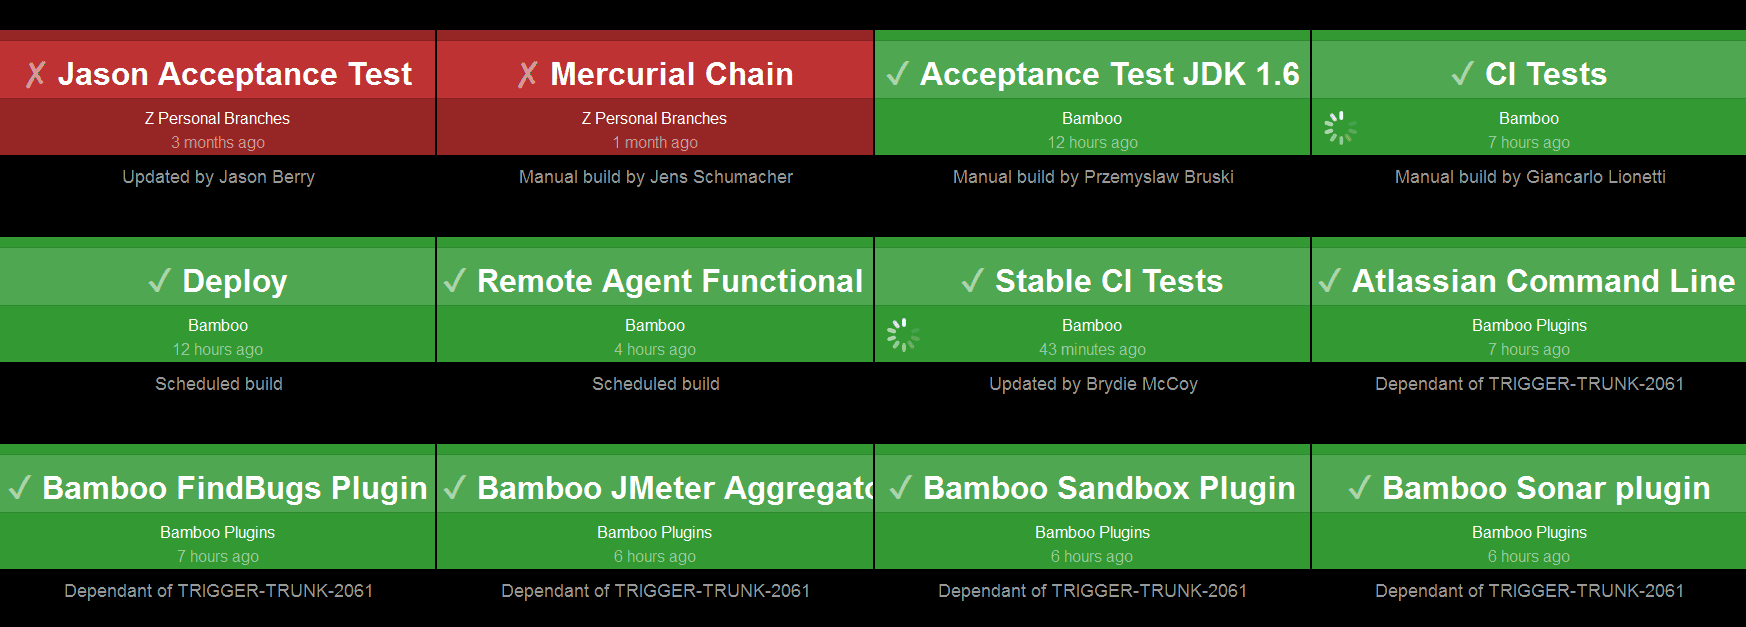
Bamboo wallboard displays the status of all the branches and the plan that the branches belong to
Rich and simple integration. Bamboo supports most major technology stacks such as CodeDeply, Ducker, Maven, Git, SVN, Mercurial, Ant, AWS, Amazon S3 Buckets. In addition, it identifies the new branches in these technologies and automatically applies customization of triggers and variables. Bamboo’s per-environment permissions feature allows for deploying to their environments.
Documentation and support. Bamboo documentation is rich and detailed. Atlassian provides skilled support. However, community size is far from Jenkins’ user reach.
Main weaknesses
Poor plugin support. In contrast to Jenkins and TeamCity, Bamboo doesn’t support that many plugins. There are only 208 apps currently listed on the Atlassian repository.
Complicated first work experience. Some users complain that the setup process of the first deploy task isn’t quite intuitive and it takes time to understand all the different options and how to use them.
Bamboo will work well for people who look for out-of-the-box integration with Atlassian products.
Travis CI: a mature CI solution with simple GitHub integration
As one of the oldest CI solutions, Travis has won the trust of many users. It has a large and helpful community that welcomes new users and provides a great number of tutorials.
Travis CI can test on Linux and macOS. Meanwhile, its documentation warns that enabling multi-OS testing can lead to some tools or languages becoming unavailable, or test failures due to the peculiarities of each file system’s behavior.
Offering many automated CI options, Travis eliminates the need for a dedicated server, as it is hosted in the cloud. However, it also has an on-premises product for companies that want to keep using the same features of the CI tools topped with on-site security needs.
Pricing models. The first 100 builds are free. Otherwise, there are four pricing plans for hobby projects ($69/month), and for small, growing, and larger teams (from $129 to 489$ per month). They differ in the number of concurrent jobs that can be run. You can also contact Travis CI to get a customized plan.
Main selling points
Easy setup and configuration. Travis CI requires no installation – you can begin testing by simply signing up and adding a project. The software can be configured with a simple YAML file, which you place in the root directory of the development project. The user interface is very responsive, most users say that it’s convenient for monitoring builds.
Direct connectivity with GitHub. Travis CI works seamlessly with popular version control systems, GitHub in particular. Moreover, the tool is free for GitHub open source projects. The CI tool registers every push to GitHub and automatically builds the branch by default.
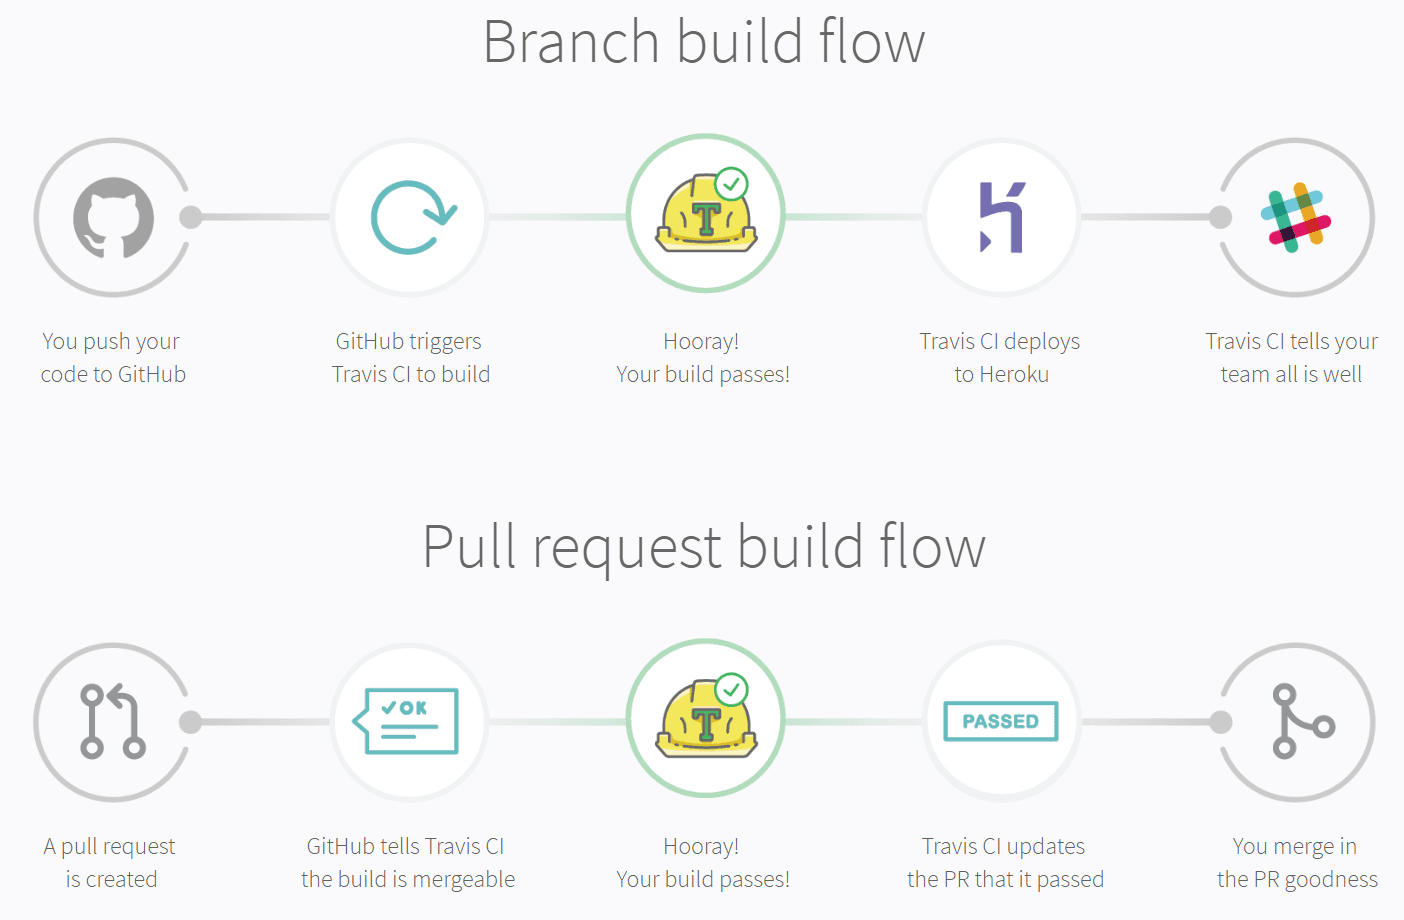
Travis CI branch build flow and pull request build flow with GitHub
Backup of the recent build. Whenever you run a new build, Travis CI clones your GitHub repository into a new virtual environment. This way you always have a backup.
Main weaknesses
No CD. Unlike other CI tools on the list, Travis CI doesn’t allow for continuous delivery.
GitHub-only hosting. Since Travis only offers support for GitHub-hosted projects, the teams that use GitLab or any other alternative, are forced to rely on another CI tool.
To sum up, Travis CI is the best solution for open-source projects that need testing in different environments. In addition, it’s the right tool for small projects, where the main goal is to start the integration as soon as possible.
CircleCI: an easy and useful CI tool for early-stage projects
CircleCI is a flexible CI tool that offers up to 16x parallelization. It intelligently notifies users providing only relevant information via email, HipChat, Campfire, and other channels. CircleCI provides easy setup and maintenance.
CircleCI is a cloud-based system that also offers an on-prem solution with security and configuration for running the tool in your private cloud or data center.
Pricing models. CircleCI has a free 2-week macOS trial that allows you to build on both Linux and macOS. The free Linux package includes one container. On adding more containers ($50/month each), you can also choose the level of parallelization (from one up to 16 concurrent jobs). MacOS plans range from $39/month for 2x concurrency to $249/month for 7x concurrency and email support.
If your enterprise has specialized needs, you can contact CircleCI directly to discuss a personal usage-based price plan. For open source projects, CircleCI allocates four free Linux containers, as well as the macOS Seed plan free at 1x concurrency.
Main selling points
Simple UI. CircleCI is recognized for its user-friendly interface for managing builds/jobs. Its single-page web app is clean and easy to understand.
CircleCI dashboard
High-quality customer support. StackShare’s community members highlight CircleCI’s speedy support: They respond to requests within 12 hours.
CircleCI runs all types of software tests including web, mobile, and container environments.
Caching of requirements installation and third-party dependencies. Instead of installing the environments, CircleCI can take data from multiple projects using the granular check-out-key options.
No need for manual debugging. CircleCI has debugging feature Debug via SSH, but Jenkins users have to debug manually by clicking on jobs.
Main weaknesses
Excessive automation. CircleCI changes environment without warning, which may be an issue. With Jenkins, it will run changes only when the user instructs.
No caching of Docker images. In Jenkins, for instance, we can cache Docker images using a private server; with CircleCI that is not possible.
No testing in Windows OS. CircleCI already supports building most applications that run on Linux, not to mention iOS and Android. However, the CI tool doesn’t yet allow for building and testing in a Windows environment.
All in all, if you need something built fast and money is not the issue, CircleCI with its parallelization features is your go-to CI tool.
CodeShip: a cloud-based CI tool with fast builds
CodeShip by CloudBees gives complete control over customizing and optimizing CI and CD workflow. This CI tool helps manage the team and streamline the projects. By means of parallel pipelines, concurrent builds, and caching, CodeShip allows for setting up powerful deployment pipelines that enable you to deploy with ease multiple times per day.
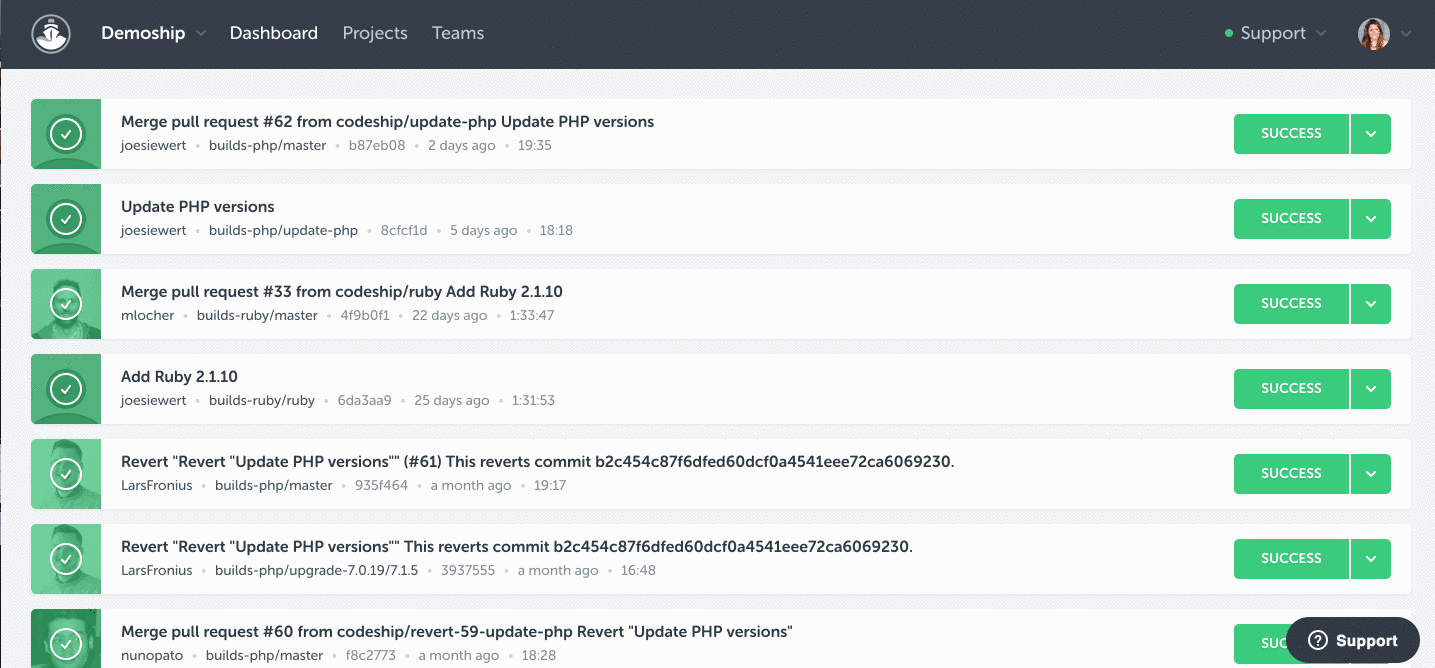
CodeShip dashboard
Pricing models. CodeShip is available in two versions: Basic and Pro. The Basic version offers pre-configured CI service with a simple web interface, but without Docker support. CodeShip Basic comes in several paid packagesfrom $49 a month to $399: The more parallelization power the package has, the higher the price tag. The Pro version supports Docker and is more flexible. You can pick your instance type and parallelization up to 20x.
There’s also a free plan limited to 100 builds/month, one concurrent build, and one parallel test pipeline. Educational projects and non-profits get 50 percent off. Open source projects are always free.
Main selling points
Centralized team management. CodeShip allows for setting up teams and permissions for your organizations and team members. Currently, they’re offering the following roles: owners, managers, PMs, and contributors.

CodeShip role permissions
Parallel tests. CodeShip has a special Parallel CI feature for running tests in parallel.
Simplified workflow. Intuitive UI for effortless configuration and file management get the workflow going quickly. Almost all G2 Crowd reviews point out that CodeShip setup is very fast and easy to get started. They say that in CodeShip all things are much easier and the deploying process much simpler than in Jenkins.
Code shipping with one button. CodeShip makes it easy to continually push out code to all the environments in one click.
Native Docker support. CodeShip is highly customizable with native support for Docker instances.
Main weaknesses
Lack of documentation. Based on reviews, there’s a lack of documentation, especially in comparison with Jenkins, and it should be extended.
Narrow OS support. CodeShip runs on Windows, macOS, and web-based devices, while the majority of the CI tools support Linux, Android, and iOS as well.
Due to its flexible plans, CodeShip can work for small teams and enterprises alike. Still, many prefer CodeShip for its reliability: “CodeShip allows us to have peace of mind with every push, to ensure that all tests and any other necessary preprocessing are completed every time,” says a review at G2 Crowd.
Final recommendations on choosing a CI tool
How to select from among the many CI solutions the one that will not only meet your current integration requirements but also evolve along with your product’s future roadmap? Going through the following checklist will make your choice easier:
Listen to your team’s needs. It’s important that the team can quickly learn how to use the chosen tool and start developing the product using its benefits. Depending on your team’s expertise level and the programming software they already work with, the range of CI tools can be narrowed down.
Keep in mind the functionality you need. Jenkins is a great solution for continuous integration, but it’s not that pointful if you already have a CI system and look for a CD tool. Smaller tools like Spinnaker are great for testing and delivery, but not meant for integration. These examples show that each tool is good at some particular functions. So first you have to figure out your primary business goal and what functionality can satisfy it.
Know your company’s data storage rules. Although it’s very convenient to leverage hosted services and tools, sometimes it may not be reasonable to hand infrastructure management to a third party. Legal and statutory requirements could turn out to be a deciding criterion if your company requires strict control over processes severely regulating access to data. In this case, your only option is to store data locally on an on-premises server.
Make sure the solution fits your budget. Consider your project’s size and go for an option that satisfies its needs at a reasonable price. For example, startups can make better use of the cloud-based CI solution, as it includes the basic essential features for a small number of users with minimal or no fees.
Open-source CI tools are mostly community-driven with plugins and support available via online tutorials, blogs, chats, and forums. However, if there’s a need for support for pipeline maintenance and no budget constraints, pick a proprietary option. Alternatively, you can stick with an open-source tool, as long as there are organizations offering commercial support for it.
Test the workflow with different CI tools. It’s very rare that a single CI tool will suffice for all scenarios. Even the prominent CI tools covered in our article can hardly meet 80 percent of the automation requirements since projects range from monolithic, monster software systems to microservices-based architectures.
A good strategy is to use multiple CI tools for different needs instead of struggling to fit all in one tool. This approach will also contribute to business continuity, securing projects if a CI tool is discontinued or its support turns out to be insufficient.


 Puppet is a pioneering configuration automation and deployment orchestration solution for distributed apps and infrastructure. The product was originally developed by
 Chef
Chef Salt was designed to enable low-latency and high-speed communication for data collection and remote execution in sysadmin environments. The platform is written in Python and uses the push model for executing commands via SSH protocol. Salt allows parallel execution of multiple commands encrypted via AES and offers both vertical and horizontal scaling. A single master can manage multiple masters, and the peer interface allows users to control multiple agents (minions) directly from an agent. In addition to the usual queries from minions, downstream events can also