Posted in Software Engineering

SAST – DAST – IAST – RAST

What Is SAST

The acronym “SAST” stands for Static Application Security Testing.

Many people tend to develop an application that could automate or execute processes very fast and also improve performance and user experience thereby forgetting the negative impact an application that lacks security could cause.

Security testing is not about speed or performance rather it is about finding vulnerabilities.

Why is it Static? This is because the test is done before an application is live and running. SAST can help to detect vulnerabilities in your application before the world finds them.

How Does It Work

SAST uses a testing methodology of analyzing a source code to detect any traces of vulnerabilities that could provide a backdoor for an attacker. SAST usually analyzes and scans an application before the code is compiled.

The process of SAST is also known as White Box Testing. Once a vulnerability is detected the next line of action is to check the code and patch the code before the code will be compiled and deployed to live.

White Box Testing is an approach or method that testers use to test the inner structure of software and see how it integrates with the external systems.

What Is DAST

“DAST” stands for Dynamic Application Security Testing. This is a security tool that is used to scan any web application to find security vulnerabilities.

This tool is used to detect vulnerabilities inside a web application that has been deployed to production. DAST tools will always send alerts to the security team assigned for immediate remediation.

DAST is a tool that can be integrated very early into the software development lifecycle and its focus is to help organizations to reduce and protect against the risk that application vulnerabilities could cause.

This tool is very different from SAST because DAST uses the Black Box Testing Methodology, it conducts its vulnerability assessment from outside as it does not have access to the application source code.

DAST is used during the testing and QA phase of SDLC.

What Is IAST

IAST” stands for Interactive Application Security Testing.

IAST is an application security tool that was designed for both web and mobile applications to detect and report issues even while the application is running. Before someone can comprehend the understanding of IAST fully, the person must know what SAST and DAST actually mean.

IAST was developed to stop all the limitations that exist in both SAST and DAST. It uses the Grey Box Testing Methodology.

How Exactly Does IAST Work

IAST testing occurs in real-time just like DAST while the application is running in the staging environment. IAST can identify the line of code causing security issues and quickly inform the developer for immediate remediation.

IAST also checks the source code just like SAST but this is at the post-build stage unlike the SAST that occur while the code is been built.

IAST agents is usually deployed on the application servers, and when DAST scanner performs it’s work by reporting a vulnerability the IAST agent that is deployed will now return a line number of the issue from the source code.

The IAST agents can be deployed on an application server and during functional testing performed by a QA tester, the agent study every pattern that a data transfer inside the application follows regardless of whether it’s dangerous or not.

For example, if data is coming from a user and the user wants to perform an SQL Injection on the application by appending SQL query to a request, then the request will be flagged as dangerous.

What Is RASP

RASP” stands for Runtime Application Self Protection.

RASP is a runtime application that is integrated into an application to analyze inward and outward traffic and end-user behavioral pattern to prevent security attacks.

This tool is different from the other tools as RASP is used after product release which makes it a more security-focused tool when compared to the others that are known for testing.

RASP is deployed to a web or application server which makes it to sit next to the main application while it’s running to monitor and analyze both the inward and outward traffic behavior.

Immediately once an issue is found, RASP will send alerts to the security team and will immediately block access to the individual making request.

When you deploy RASP, it will secure the whole application against different attacks as it does not just wait or try to rely only on specific signatures of some known vulnerabilities.

RASP is a complete solution that observes every little detail of different attacks on your application and also knows your application behavior.

Posted in Devops, Security

Kubernetes – Sealed Secret

Commiting kubernetes secret.yaml is a big security issue, no body should do that. secret.yaml file is masked with base64 format only. Sealed secret come to rescue, it provide encryption to your secret.yaml file. It produce sealed secret yaml is git safe.

Overview

Sealed Secrets is composed of two parts:

  • A cluster-side controller called sealed-secret
  • A client-side utility called kubeseal

Upon startup, the controller looks for a cluster-wide private/public key pair, and generates a new 4096 bit RSA key pair if not found. The private key is persisted in a Secret object in the same namespace as that of the controller. The public key portion of this is made publicly available to anyone wanting to use SealedSecrets with this cluster.

During encryption, each value in the original Secret is symmetrically encrypted using AES-256 with a randomly-generated session key. The session key is then asymmetrically encrypted with the controller’s public key using SHA256 and the original Secret’s namespace/name as the input parameter. The output of the encryption process is a string that is constructed as follows:
length (2 bytes) of encrypted session key + encrypted session key + encrypted Secret

When a SealedSecret custom resource is deployed to the Kubernetes cluster, the controller will pick it up, unseal it using the private key and create a Secret resource. During decryption, the SealedSecret’s namespace/name is used again as the input parameter. This ensures that the SealedSecret and Secret are strictly tied to the same namespace and name.

The companion CLI tool kubeseal is used for creating a SealedSecret custom resource definition (CRD) from a Secret resource definition using the public key. kubeseal can communicate with the controller through the Kubernetes API server and retrieve the public key needed for encrypting a Secret at run-time. The public key may also be downloaded from the controller and saved locally to be used offline.

Installation

  • kubeseal installation in macOS
brew install kubeseal
  • sealed-secret installation
helm repo add sealed-secrets https://bitnami-labs.github.io/sealed-secrets
helm repo update
helm install sealed-secrets-controller --namespace kube-system  sealed-secrets/sealed-secrets

Usage

create a secret.yaml as the followings

apiVersion: v1
data:
  pwd: <your password in base64>
  user: <user name in base64>
kind: Secret
metadata:
  name: db-credentials
  namespace: yournamespace
type: Opaque

run the following command

 kubeseal < secret.yaml  -o yaml > secret-sealed.yaml

secret-sealed.yaml is the output file. It is safe to be commited to git, since the content are encrypted

cat secret-sealed.yaml
apiVersion: bitnami.com/v1alpha1
kind: SealedSecret
metadata:
  creationTimestamp: null
  name: db-credentials
  namespace: yournamespace
spec:
  encryptedData:
    pwd: AgBoiVB8Jvr9mWxs0J...
    user: AgAXe2L9vJSnykAmulhGK2P0BIQZo1AP... 
    template:
    data: null
    metadata : 
      creationTimestamp: null
      name: db-credentials
      namespace: yournamespace
    type: Opaque

now you can deploy the secret-sealed.yaml using kubectl apply command

kubectl apply -f secret-sealed.yaml

and check if your secret is properly generated

kubectl -n yournamespace get secret db-credentials -o yaml

apiVersion: v1
data:
  pwd: <your base64 pwd>
  user: <your base64 user>
kind: Secret
metadata:
  creationTimestamp: "2022-07-06T09:47:28Z"
  name: db-credentials
  namespace: yournamespace
  ownerReferences:
  - apiVersion: bitnami.com/v1alpha1
    controller: true
    kind: SealedSecret
    name: db-credentials
    uid: df9ddbf9-c996-48ff-92e1-6e2d6cbec84d
  resourceVersion: "46630112"
  uid: ef249c09-0c63-4b2e-a45d-5131b0cb5dd5
type: Opaque
Posted in Cloud, Software Architecture

Kubernetes – Trick to scale down / up daemonset

When the pod controlled by daemonset,Some error occur in the pod and it's state will be CrashLoopBackOff, I want to delete these pods but not delete the DaemonSet.

Answer

  • Scaling k8s daemonset down to zero
kubectl -n kube-system patch daemonset myDaemonset -p '{"spec": {"template": {"spec": {"nodeSelector": {"non-existing": "true"}}}}}'
  • Scaling up k8s daemonset
kubectl -n kube-system patch daemonset myDaemonset --type json -p='[{"op": "remove", "path": "/spec/template/spec/nodeSelector/non-existing"}]'
Posted in Software Engineering

SSH Tunneling – port forwarding

SSH tunneling (also referred to as SSH port forwarding) is simply routing local network traffic through SSH to remote hosts. This implies that all your connections are secured using encryption. It provides an easy way of setting up a basic VPN (Virtual Private Network), useful for connecting to private networks over unsecure public networks like the Internet.

You may also be used to expose local servers behind NATs and firewalls to the Internet over secure tunnels, as implemented in ngrok.

SSH sessions permit tunneling network connections by default and there are three types of SSH port forwarding: localremote and dynamic port forwarding.

In this article, we will demonstrate how to quickly and easily setup a SSH tunneling or the different types of port forwarding in Linux.

Testing Environment:

For the purpose of this article, we are using the following setup:

  1. Local Host: 192.168.43.31
  2. Remote HostLinode CentOS 7 VPS with hostname server1.example.com.

Usually, you can securely connect to a remote server using SSH as follows. In this example, I have configured passwordless SSH login between my local and remote hosts, so it has not asked for user admin’s password.

$ ssh admin@server1.example.com  
Connect Remote SSH Without Password

Local SSH Port Forwarding

This type of port forwarding lets you connect from your local computer to a remote server. Assuming you are behind a restrictive firewall, or blocked by an outgoing firewall from accessing an application running on port 3000 on your remote server.

You can forward a local port (e.g 8080) which you can then use to access the application locally as follows. The -L flag defines the port forwarded to the remote host and remote port.

$ ssh admin@server1.example.com -L 8080: server1.example.com:3000

Adding the -N flag means do not execute a remote command, you will not get a shell in this case.

$ ssh -N admin@server1.example.com -L 8080: server1.example.com:3000

The -f switch instructs ssh to run in the background.

$ ssh -f -N admin@server1.example.com -L 8080: server1.example.com:3000

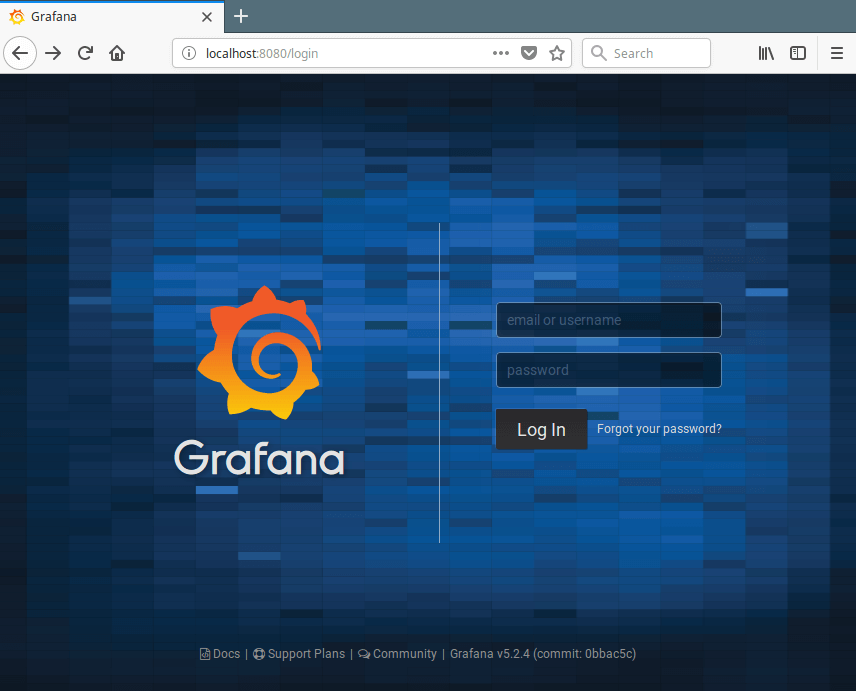
Now, on your local machine, open a browser, instead of accessing the remote application using the address server1.example.com:3000, you can simply use localhost:8080 or 192.168.43.31:8080, as shown in the screenshot below.

Access a Remote App via Local SSH Port Forwarding

Remote SSH Port Forwarding

Remote port forwarding allows you to connect from your remote machine to the local computer. By default, SSH does not permit remote port forwarding. You can enable this using the GatewayPorts directive in you SSHD main configuration file /etc/ssh/sshd_config on the remote host.

Open the file for editing using your favorite command line editor.

$ sudo vim /etc/ssh/sshd_config 

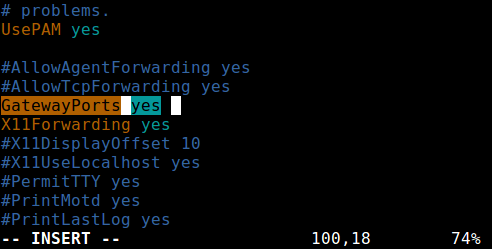
Look for the required directive, uncomment it and set its value to yes, as shown in the screenshot.

GatewayPorts yes
Enable Remote SSH Port Forwarding

Save the changes and exit. Next, you need to restart sshd to apply the recent change you made.

$ sudo systemctl restart sshd
OR
$ sudo service sshd restart 

Next run the following command to forward port 5000 on the remote machine to port 3000 on the local machine.

$ ssh -f -N admin@server1.example.com -R 5000:localhost:3000

Once you understand this method of tunneling, you can easily and securely expose a local development server, especially behind NATs and firewalls to the Internet over secure tunnels. Tunnels such as Ngrokpagekitelocaltunnel and many others work in a similar way.

Dynamic SSH Port Forwarding

This is the third type of port forwarding. Unlike local and remote port forwarding which allow communication with a single port, it makes possible, a full range of TCP communications across a range of ports. Dynamic port forwarding sets up your machine as a SOCKS proxy server which listens on port 1080, by default.

For starters, SOCKS is an Internet protocol that defines how a client can connect to a server via a proxy server (SSH in this case). You can enable dynamic port forwarding using the -D option.

The following command will start a SOCKS proxy on port 1080 allowing you to connect to the remote host.

$ ssh -f -N -D 1080 admin@server1.example.com

From now on, you can make applications on your machine use this SSH proxy server by editing their settings and configuring them to use it, to connect to your remote server. Note that the SOCKS proxy will stop working after you close your SSH session.

Posted in Cloud, Software Engineering

Redshift


In Redshift, if your query operation hangs or stops responding, below are the possible causes as well as its corresponding solution:

Connection to the Database Is Dropped

Reduce the size of maximum transmission unit (MTU). The MTU size determines the maximum size, in bytes, of a packet that can be transferred in one Ethernet frame over your network connection

Connection to the Database Times Out

Your client connection to the database appears to hang or timeout when running long queries, such as a COPY command. In this case, you might observe that the Amazon Redshift console displays that the query has completed, but the client tool itself still appears to be running the query. The results of the query might be missing or incomplete depending on when the connection stopped. This effect happens when idle connections are terminated by an intermediate network component

Client-Side Out-of-Memory Error Occurs with ODBC

If your client application uses an ODBC connection and your query creates a result set that is too large to fit in memory, you can stream the result set to your client application by using a cursor. For more information, see DECLARE and Performance Considerations When Using Cursors.

Client-Side Out-of-Memory Error Occurs with JDBC

When you attempt to retrieve large result sets over a JDBC connection, you might encounter client-side out-of-memory errors.

There Is a Potential Deadlock

If there is a potential deadlock, try the following:

– View the STV_LOCKS and STL_TR_CONFLICT system tables to find conflicts involving updates to more than one table.

– Use the PG_CANCEL_BACKEND function to cancel one or more conflicting queries.

– Use the PG_TERMINATE_BACKEND function to terminate a session, which forces any currently running transactions in the terminated session to release all locks and roll back the transaction.

– Schedule concurrent write operations carefully.

Posted in Cloud, Software Engineering

AWS – System Manager

AWS System manager has powerful features to manages our EC2 – instances, following are the overview

AWS Systems Manager Patch Manager

AWS Systems Manager Patch Manager automates the process of patching managed instances with security-related updates. For Linux-based instances, we can also install patches for non-security updates. We can patch fleets of Amazon EC2 instances or our on-premises servers and virtual machines (VMs) by operating system type. This includes supported versions of Windows, Ubuntu Server, Red Hat Enterprise Linux (RHEL), SUSE Linux Enterprise Server (SLES), Amazon Linux, and Amazon Linux 2. We can scan instances to see only a report of missing patches, or we can scan and automatically install all missing patches.

AWS Systems Manager State Manager

AWS Systems Manager State Manager is primarily used as a secure and scalable configuration management service that automates the process of keeping our Amazon EC2 and hybrid infrastructure in a state that our define. This does not handle patch management, unlike AWS Systems Manager Patch Manager. With the State Manager, we can configure our instances to boot with a specific software at start-up; download and update agents on a defined schedule; configure network settings and many others, but not the patching of our EC2 instances.

AWS Systems Manager Session Manager

 AWS Systems Manager Session Manager is primarily used to comply with corporate policies that require controlled access to instances, strict security practices, and fully auditable logs with instance access details but not for applying OS patches.

AWS Systems Manager Maintenance Windows

AWS Systems Manager Maintenance Windows let us define a schedule for when to perform potentially disruptive actions on our instances such as patching an operating system, updating drivers, or installing software or patches. Each Maintenance Window has a schedule, a maximum duration, a set of registered targets (the instances that are acted upon), and a set of registered tasks. We can also specify dates that a Maintenance Window should not run before or after, and we can specify the international time zone on which to base the Maintenance Window schedule.

Posted in Cloud

AWS – DNSSEC

TL DR

For the web domain registration, use Amazon Route 53 and then register a 2048-bit RSASHA256 encryption key from a third-party certificate service. Enable Domain Name System Security Extensions (DNSSEC) by using a 3rd party DNS provider that uses customer managed keys. Register the SSL certificates in ACM and attach them to the Application Load Balancer. Configure the Server Name Identification extension in all user requests to the website.

Details

Attackers sometimes hijack traffic to internet endpoints such as web servers by intercepting DNS queries and returning their own IP addresses to DNS resolvers in place of the actual IP addresses for those endpoints. Users are then routed to the IP addresses provided by the attackers in the spoofed response, for example, to fake websites. You can protect your domain from this type of attack, known as DNS spoofing or a man-in-the-middle attack, by configuring Domain Name System Security Extensions (DNSSEC), a protocol for securing DNS traffic.

AWS Route 53 – Registered Domain

Amazon Route 53 supports DNSSEC for domain registration. However, Route 53 does not support DNSSEC for DNS service, regardless of whether the domain is registered with Route 53. If you want to configure DNSSEC for a domain that is registered with Route 53, you must either use another DNS service provider or set up your own DNS server.

Posted in Software Engineering

What is Backpressure?

Backpressuring is simply the process of handling a fast item producer. If an Observable produces 1_000_000 items per second how a subscriber which can handle only 100 items per second does process the items? The Observable class has an unbounded buffer size, it means it will buffer everything and pushes it to the subscriber, that’s where you get the OutOfMemoryException.
By applying Backpressure onto a stream, it’ll be possible to handle items as needed, unnecessary items can be discarded or even let the producer know when to create and push the new items.

What is the problem?

bigTable.selectAll() // <=== or a hot observable like mouse movement

.map(/** mapping **/)

.observeOn(yourSchedular())

.subscribe(data -> { doSomethingHere(data) });

The problem of the code above is, it’s fetching all the rows from the database and pushes it to downstream, which results in high memory usage because it buffers all the data into memory. Do we want all of the data? Yes! but do we need all of it at once? No

I see this kind of usage in lots of projects, I’m pretty sure most of us have done something like this before even though knowing something is wrong, querying a database and assuming there won’t be lots of data, then it will and we end up with a poor app performance in production. If we are lucky enough we’ll get an OOM Exception but most of the times the app behaves slow and sluggish.

What is the solution?

Backpressure to rescue!! back in RxJava 1, the Observable class was responsible for the backpressure of streams, since RxJava 2 there is a separate class for handling the backpressure, Flowable.

How to create a Flowable?

There are multiple ways for creating a backpressure stream:

  1. Converting the Observable to Flowable with the x.toFloawable() method
Observable.range(1, 1_000_000).toFlowable(BackpressureStrategy.Drop)

With the Drop strategy the downstream doesn’t get all the one million items, it gets the items as it handles the previous items.

example output:
1
2
3
...
100
101
drops some of the items here
100,051
100,052
100,053
...
drops again
523,020
523,021
...
and so on

Note if you subscribe without changing the schedular you will get the whole one million items, since it’s synchronous the producers is blocked by the subscriber.

BackpressureStrategy

There are a few backpressure strategies:

  • Drop: Discards the unrequested items if it exceeds the buffer size
  • Buffer: Buffers all the items from the producer, watch for OOMs
  • Latest: Keeps only the most recent item
  • Error: throws a MissingBackpressureException in case of over emission
  • Missing: No strategy, it would throw a MissingBackpressureException sooner or later somewhere on the downstream

2. Use the Flowable.create() factory method:

We won’t get much more functionality than the x.toFlowable() here. let’s skip this one.

3. Use the Flowable.generate() factory method:

This is what we were looking for, the generate method has a few overloads, this is the one which can satisfy our needs.

Flowable.generate(

() -> 0, //initial state

(state, emitter) -> { //current state

emitter.onNext(state);

return current + 1; // next state

}

)

This code generates a stream of positive numbers: 0,1,2,3,4,5,6,…

The first parameter is a Callable to return an initial state. The second one is a BiFunction which gets called upon on every request to create a new item, its parameters are the current state and an emitter. So let’s apply it to our database code:

Flowable<List<Data>> select(int page, int pageSize) {

return Flowable.generate(

() -> page, //initial page

(currentPage, emitter) -> {

emitter.onNext(table.select("Select * From myTable LIMIT $pageSize OFFSET ${page * pageSize}"));

return currentPage + 1; // next page

});

}

Why there is no string templating in recent java releases, java 9, 10, 11?!! WTH Java

Now we can call it like this:

myTable.select(1, 10)

.map(/** mapping **/)

.flatMap(items -> {}, 1)// <== 1 indicates how many concurrent task should be executed

// observeOn uses a default 128 buffer size so we overwrite it

.observeOn(Schedulers.single(), false, 1)

.subscribe(new DefaultSubscriber<List<Data>>() {

@Override

protected void onStart() {

// super.onStart(); the the default implementation requests Long.MAX_VALUE

request(1);

}


@Override

public void onNext(List<Data> data) {

doSomethingHere(data);

request(1); // if you want more data

}


@Override

public void onError(Throwable t) {

t.printStackTrace();


}


@Override

public void onComplete() {

System.out.println("onComplete");

}

});

That’s all there’s to it. 😃

Posted in Software Engineering

Transaction Isolation

As we know that, in order to maintain consistency in a database, it follows ACID properties. Among these four properties (Atomicity, Consistency, Isolation and Durability) Isolation determines how transaction integrity is visible to other users and systems. It means that a transaction should take place in a system in such a way that it is the only transaction that is accessing the resources in a database system.
Isolation levels define the degree to which a transaction must be isolated from the data modifications made by any other transaction in the database system. A transaction isolation level is defined by the following phenomena –

  • Dirty Read – A Dirty read is the situation when a transaction reads a data that has not yet been committed. For example, Let’s say transaction 1 updates a row and leaves it uncommitted, meanwhile, Transaction 2 reads the updated row. If transaction 1 rolls back the change, transaction 2 will have read data that is considered never to have existed.
  • Non Repeatable read – Non Repeatable read occurs when a transaction reads same row twice, and get a different value each time. For example, suppose transaction T1 reads data. Due to concurrency, another transaction T2 updates the same data and commit, Now if transaction T1 rereads the same data, it will retrieve a different value.
  • Phantom Read – Phantom Read occurs when two same queries are executed, but the rows retrieved by the two, are different. For example, suppose transaction T1 retrieves a set of rows that satisfy some search criteria. Now, Transaction T2 generates some new rows that match the search criteria for transaction T1. If transaction T1 re-executes the statement that reads the rows, it gets a different set of rows this time.

Based on these phenomena, The SQL standard defines four isolation levels :

  1. Read Uncommitted – Read Uncommitted is the lowest isolation level. In this level, one transaction may read not yet committed changes made by other transaction, thereby allowing dirty reads. In this level, transactions are not isolated from each other.
  2. Read Committed – This isolation level guarantees that any data read is committed at the moment it is read. Thus it does not allows dirty read. The transaction holds a read or write lock on the current row, and thus prevent other transactions from reading, updating or deleting it.
  3. Repeatable Read – This is the most restrictive isolation level. The transaction holds read locks on all rows it references and writes locks on all rows it inserts, updates, or deletes. Since other transaction cannot read, update or delete these rows, consequently it avoids non-repeatable read.
  4. Serializable – This is the Highest isolation level. A serializable execution is guaranteed to be serializable. Serializable execution is defined to be an execution of operations in which concurrently executing transactions appears to be serially executing.

The Table is given below clearly depicts the relationship between isolation levels, read phenomena and locks :


Anomaly Serializable is not the same as Serializable. That is, it is necessary, but not sufficient that a Serializable schedule should be free of all three phenomena types.

Posted in Software Engineering

Threadpool executor

Overview

Original post: http://blog.csdn.net/qq_25806863/article/details/71172823

Analysis When ThreadPool Executor is constructed There is a RejectedExecutionHandler parameter.

Rejected Execution Handler is an interface:

public interface RejectedExecutionHandler {
    void rejectedExecution(Runnable r, ThreadPoolExecutor executor);
}

There is only one way. When the number of threads to be created is greater than the maximum number of threads in the thread pool, the new task is rejected and the method in this interface is called.

This interface can be implemented by itself to handle these tasks that exceed the number.

ThreadPool Executor itself has provided four rejection strategies:

  1. Caller Runs Policy
  2. AbortPolicy
  3. Discard Policy
  4. Discard Oldest Policy.

These four rejection strategies are very simple when you look at the implementation method.

AbortPolicy

The default rejection strategy in ThreadPool Executor is AbortPolicy. Throw an exception directly.

private static final RejectedExecutionHandler defaultHandler =
    new AbortPolicy();

The following is his realization:

public static class AbortPolicy implements RejectedExecutionHandler {
    public AbortPolicy() { }
    public void rejectedExecution(Runnable r, ThreadPoolExecutor e) {
        throw new RejectedExecutionException("Task " + r.toString() +
                                             " rejected from " +
                                             e.toString());
    }
}

Simple and rude, throw a RejectedExecutionException exception directly, and don’t perform this task.

test

First, customize a Runnable to give each thread a name. Next, use this Runnable.

static class MyThread implements Runnable {
        String name;
        public MyThread(String name) {
            this.name = name;
        }
        @Override
        public void run() {
            try {
                Thread.sleep(2000);
            } catch (InterruptedException e) {
                e.printStackTrace();
            }
            System.out.println("thread:"+Thread.currentThread().getName() +" implement:"+name +"  run");
        }
    }

Then we construct a thread pool with a core thread of 1 and a maximum number of threads of 2. The rejection strategy is AbortPolicy

ThreadPoolExecutor executor = new ThreadPoolExecutor(1, 2, 0, 
        TimeUnit.MICROSECONDS, 
        new LinkedBlockingDeque<Runnable>(2), 
        new ThreadPoolExecutor.AbortPolicy());
for (int i = 0; i < 6; i++) {
    System.out.println("Adding the _____________"+i+"Tasks");
    executor.execute(new MyThread("thread"+i));
    Iterator iterator = executor.getQueue().iterator();
    while (iterator.hasNext()){
        MyThread thread = (MyThread) iterator.next();
        System.out.println("List:"+thread.name);
    }
}

The output is:

Analyse the process.

  1. When the first task is added, it is executed directly and the task list is empty.
  2. When adding the second task, because the LinkedBlocking Deque is used and the core thread is executing the task, the second task will be placed in the queue with thread 2 in the queue.
  3. When the third task is added, it will also be placed in the queue, where there are threads 2 and 3.
  4. When adding the fourth task, because the core task is still running and the task queue is full, Hu directly creates a new thread to perform the fourth task. At this time, there are two threads running in the thread pool, reaching the maximum number of threads. There are threads 2 and 3 in the task queue.
  5. When the fifth task is added, there is no place to store and execute it anymore, and it will be rejected by the thread pool to execute the rejected Execution method of the rejected Execution method of the AbortPolicy, which throws an exception directly.
  6. Ultimately, only four threads can run. The latter were rejected.

CallerRunsPolicy

CallerRunsPolicy calls the thread in the current thread pool to execute the rejected task after the task is refused to be added.

The following is his realization:

public static class CallerRunsPolicy implements RejectedExecutionHandler {
    public CallerRunsPolicy() { }
    public void rejectedExecution(Runnable r, ThreadPoolExecutor e) {
        if (!e.isShutdown()) {
            r.run();
        }
    }
}

It’s also simple, run directly.

test

ThreadPoolExecutor executor = new ThreadPoolExecutor(1, 2, 30,
        TimeUnit.SECONDS,
        new LinkedBlockingDeque<Runnable>(2),
        new ThreadPoolExecutor.AbortPolicy());

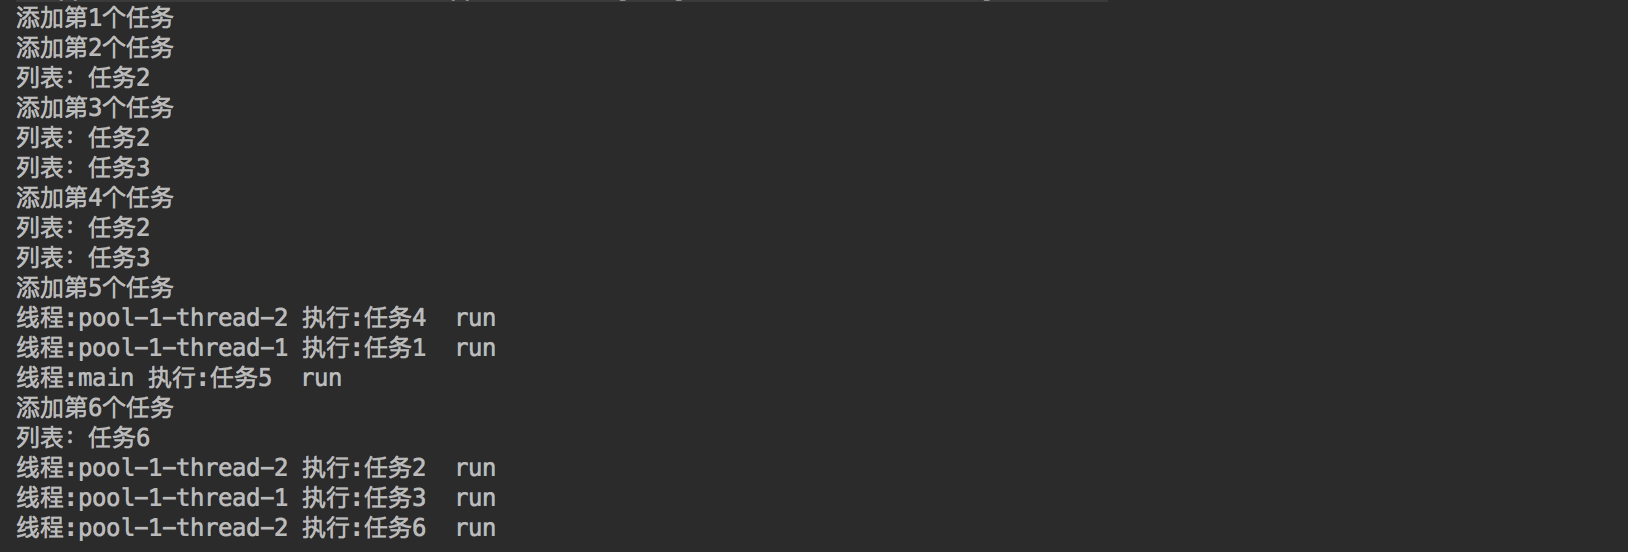
According to the above operation, output

Note that the fifth task, Task 5, is also rejected by the thread pool, so the rejected Execution method of CallerRunsPolicy is executed, which directly executes the run method of the task. So you can see that Task 5 is executed in the main thread.

It can also be seen from this that because the fifth task runs in the main thread, the main thread is blocked, so that when the fifth task is finished and the sixth task is added, the first two tasks are finished and there are idle threads, so thread 6 can be added to the thread pool to execute.

The disadvantage of this strategy is that it may block the main thread.

DiscardPolicy

This strategy is much simpler to handle. Looking at the implementation, we can see that:

public static class DiscardPolicy implements RejectedExecutionHandler {
    public DiscardPolicy() { }
    public void rejectedExecution(Runnable r, ThreadPoolExecutor e) {
    }
}

This thing did nothing.

Therefore, using this rejection strategy, tasks rejected by thread pools will be discarded directly, no exception will be discarded and no execution will be performed.

test

ThreadPoolExecutor executor = new ThreadPoolExecutor(1, 2, 30,
        TimeUnit.SECONDS,
        new LinkedBlockingDeque<Runnable>(2),
        new ThreadPoolExecutor.DiscardPolicy());

Output:

As you can see, the tasks 5 and 6 added later will not be executed at all, and there will be no response, and they will be discarded directly.

DiscardOldestPolicy

The role of the Discard Oldest Policy strategy is to abandon the oldest task in the task queue when the task refuses to be added, that is, to join the queue first, and then to add the new task.

public static class DiscardOldestPolicy implements RejectedExecutionHandler {
    public DiscardOldestPolicy() { }
    public void rejectedExecution(Runnable r, ThreadPoolExecutor e) {
        if (!e.isShutdown()) {
            e.getQueue().poll();
            e.execute(r);
        }
    }
}

In rejected Execution, the first joined task is popped up from the task queue, a position is vacated, and then the execute method is executed again to join the task in the queue.

test

ThreadPoolExecutor executor = new ThreadPoolExecutor(1, 2, 30,
        TimeUnit.SECONDS,
        new LinkedBlockingDeque<Runnable>(2),
        new ThreadPoolExecutor.DiscardOldestPolicy());

The output is:

As you can see,

  1. When the fifth task is added, it is rejected by the thread pool. At this point, there are tasks 2 and 3 in the task queue.
  2. At this point, the rejection strategy will make the first task in the task queue pop up, that is task 2.
  3. Then the rejected task 5 is added to the human task queue, and then the task queue becomes task 3 and task 5.
  4. When the sixth task is added, because of the same process, task 3 in the queue is discarded and task 6 is added. Task 5 and task 6 are added to the queue.
  5. Therefore, only 1, 4, 5, 6. Task 2 and task 3 times abandoned, will not be executed.

Custom Denial Policy

Looking at the four rejection strategies provided by the previous system, we can see that the implementation of the rejection strategy is very simple. The same is true of self-writing.

For example, if you want the rejected task to be executed in a new thread, you can write as follows:

static class MyRejectedExecutionHandler implements RejectedExecutionHandler {
    @Override
    public void rejectedExecution(Runnable r, ThreadPoolExecutor executor) {
        new Thread(r,"New Threads"+new Random().nextInt(10)).start();
    }
}

Then use it normally:

ThreadPoolExecutor executor = new ThreadPoolExecutor(1, 2, 30,
        TimeUnit.SECONDS,
        new LinkedBlockingDeque<Runnable>(2),
        new MyRejectedExecutionHandler());

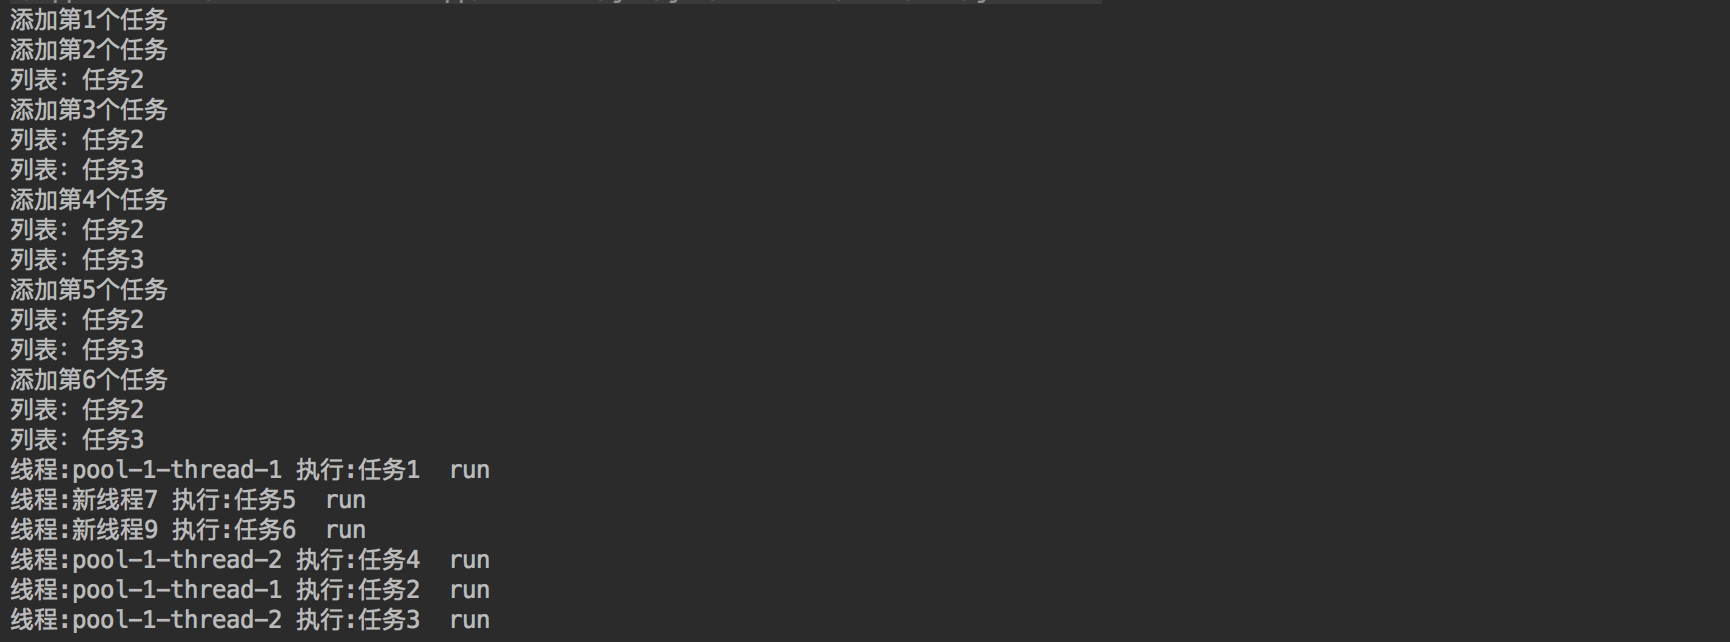
Output:

Tasks 5 and 6 that were rejected were found to be executed in the new thread.